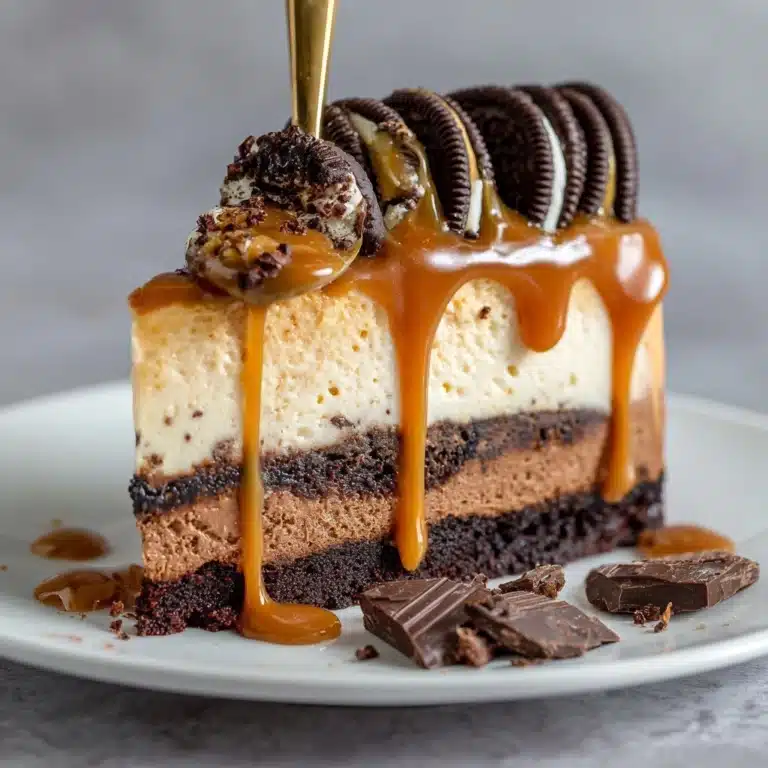
Decadent Peanut Butter Chocolate Crunch Bar Recipe
If you have a serious sweet tooth and love the perfect blend of creamy, crunchy, and chocolatey, I have to introduce you to the Decadent Peanut Butter Chocolate Crunch Bar. This no-bake marvel combines a crisp chocolate wafer crust, luscious peanut butter cheesecake filling, a gooey caramel or toffee layer, and a silky dark chocolate ganache topping all in one stunning bar. Every bite offers a delightful crunch alongside rich, creamy textures that make it impossible to stop at just one. Trust me, once you try this bar, it will become your go-to dessert for gatherings, celebrations, or cozy nights in.

Ingredients You’ll Need
The secret to this decadent bar lies in simple, well-chosen ingredients that each play a crucial role in flavor, texture, and appearance. From buttery crumbs to smooth cream cheese and rich chocolate, gathering these essentials sets you up for dessert success.
- Chocolate Wafer or Oreo Crumbs: These create the crunchy, chocolaty base that holds everything together and adds texture.
- Granulated Sugar: Adds just the right touch of sweetness to the crust without overpowering it.
- Unsalted Butter: Melted and mixed into the crumbs, it binds the crust while adding richness.
- Full-Fat Cream Cheese: The creamy foundation for the filling, essential for that smooth, luscious texture.
- Smooth Peanut Butter: Brings that irresistible nutty flavor, perfectly balancing the sweet and salty notes.
- Powdered Sugar: Sweetens the cheesecake filling while keeping it silky smooth.
- Vanilla Extract: Enhances the overall flavor, adding warmth and depth.
- Heavy Whipping Cream: Whipped into the filling for an airy, light mouthfeel.
- Store-Bought Caramel Sauce or Peanut Butter Ganache: A sticky, gooey layer that adds decadence and complements the peanut butter beautifully.
- Dark Chocolate: Used in the ganache topping for a rich, glossy finish and intense chocolate flavor.
- Mini Chocolate Chips or Chocolate Shavings: For that extra crunch and decorative flair on top.
How to Make Decadent Peanut Butter Chocolate Crunch Bar
Step 1: Create the Chocolate Crumble Crust
Start by combining your finely crushed chocolate wafer or Oreo crumbs with granulated sugar and melted unsalted butter until every crumb is fully coated and moist. Press this mixture firmly and evenly into the bottom of an 8×8 inch pan lined with parchment paper. Place it in the freezer to chill and solidify while you prepare the next layer. This crust forms the sturdy yet crunchy backbone that supports all the luscious fillings.
Step 2: Whip Up the Peanut Butter Cheesecake Filling
In a mixing bowl, beat together softened full-fat cream cheese, smooth peanut butter, powdered sugar, and vanilla extract until the mixture is silky and free of lumps. Slowly incorporate the cold heavy whipping cream until the filling becomes thick, light, and airy. This luxurious peanut butter cheesecake layer melts in your mouth and contrasts beautifully with the crunchy base.
Step 3: Assemble the Layers
Spread the peanut butter cheesecake filling evenly over the chilled crust. Refrigerate for at least 2 hours to let it firm up, or speed things along with 30 minutes in the freezer. Once set, carefully spread a thin, even layer of store-bought caramel sauce or luscious peanut butter ganache on top. This sticky layer adds a sensational gooey texture and an extra dimension of flavor.
Step 4: Apply the Chocolate Ganache Topping
Gently heat the heavy cream until it just begins to simmer, then pour it over finely chopped dark chocolate in a separate bowl. Let it sit for 5 minutes before stirring until completely smooth and glossy. Allow the ganache to cool slightly and pour it over the caramel layer, tilting the pan to spread it evenly. While still soft, sprinkle mini chocolate chips or chocolate shavings on top for crunch and decoration. Refrigerate again for at least 2 hours until the ganache sets perfectly.
Step 5: Serve and Enjoy
When ready to serve, carefully lift the entire bar out of the pan using the parchment paper edges. Cut into neat squares and garnish with extra crumbs or chocolate chips if you like. Each bite reveals layers of crunch, creaminess, and rich chocolate that will have everyone asking for your recipe.
How to Serve Decadent Peanut Butter Chocolate Crunch Bar

Garnishes
Enhance the beauty and flavor of your bars with fresh garnishes like a sprinkle of crushed peanuts, a drizzle of extra caramel, or even a pinch of sea salt. These little touches elevate the dessert and add bursts of texture and taste with each bite.
Side Dishes
Serve slices alongside a scoop of vanilla ice cream or fresh berries for a refreshing balance to the richness. A cup of coffee or cold milk pairs wonderfully, helping to temper the intense flavors while complementing the creamy peanut butter and chocolate layers.
Creative Ways to Present
Consider layering individual bars in clear dessert cups with whipped cream and crushed crumbs for a stunning visual treat. For parties, arranging the bars on a decorative platter with edible flowers or chocolate curls invites guests to indulge in style. These creative presentations turn a simple dessert into an Instagram-worthy showstopper.
Make Ahead and Storage
Storing Leftovers
The Decadent Peanut Butter Chocolate Crunch Bar keeps beautifully in the refrigerator, covered tightly with plastic wrap or stored in an airtight container. This ensures the layers stay fresh and the crust remains crisp for up to 4 days. It’s an ideal make-ahead dessert that rewards you again and again.
Freezing
You can freeze the bars wrapped individually or as a whole slab, firmly sealed to prevent freezer burn. Freeze for up to 2 months, making it easy to prepare in advance for special occasions or unexpected dessert cravings. Thaw overnight in the fridge before serving for the best texture.
Reheating
Since this is a no-bake, creamy bar with delicate layers, it’s best enjoyed chilled and not reheated. If you prefer it slightly softer, let it sit at room temperature for about 10 minutes before slicing and serving. This softens the ganache just enough without compromising the crunchy base.
FAQs
Can I use crunchy peanut butter instead of smooth?
While smooth peanut butter creates a creamier filling, using crunchy peanut butter adds an extra nutty texture that some people love. Just be aware it may change the smoothness of the cheesecake layer slightly.
Is there a gluten-free option for the crust?
Absolutely! You can substitute gluten-free chocolate wafer crumbs or gluten-free cookies to make the crust suitable for those avoiding gluten, keeping all the decadence intact.
Can I substitute the caramel sauce with something homemade?
Yes, homemade caramel or even a peanut butter toffee sauce both work beautifully here. Just ensure your sauce is thick enough to create that gooey middle layer without running into the cheesecake filling.
How do I get a glossy ganache topping?
The secret is heating the cream just until simmering, not boiling, and allowing it to rest on the chocolate before stirring. This technique creates a smooth, shiny ganache that looks as incredible as it tastes.
Can these bars be made vegan?
To make a vegan version, swap out cream cheese, butter, and cream for plant-based alternatives. Use vegan chocolate and ensure the ingredients like caramel sauce are also free from animal products. The texture might differ slightly but the flavor will still be amazing!
Final Thoughts
The Decadent Peanut Butter Chocolate Crunch Bar is truly a showstopper dessert that transforms simple ingredients into a sensational, layered masterpiece. Whether you’re making it for a special occasion or just treating yourself, this bar promises to deliver indulgent flavors and textures that will make your heart sing. Give it a try and prepare to fall in love with every bite!
PrintDecadent Peanut Butter Chocolate Crunch Bar Recipe
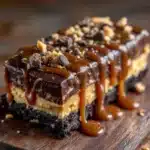
Decadent Peanut Butter Chocolate Crunch Bars are a luscious no-bake dessert featuring a crunchy chocolate cookie crust, creamy peanut butter cheesecake filling, a sticky caramel or toffee layer, and a glossy dark chocolate ganache topping. These layered bars offer a perfect balance of sweet, salty, and rich chocolate-peanut butter flavors, making them ideal for parties or indulgent treats.
- Prep Time: 30 minutes
- Cook Time: 0 minutes
- Total Time: 4 hours 30 minutes
- Yield: 16 squares 1x
- Category: Dessert, No-Bake Bar
- Method: No-Bake, Layered Assembly
- Cuisine: American
- Diet: Vegetarian
Ingredients
Chocolate Crumble Crust
- 1 1/2 cups Chocolate Wafer or Oreo Crumbs (finely crushed)
- 1/4 cup Granulated Sugar
- 6 tablespoons Unsalted Butter (melted)
Peanut Butter Cheesecake Filling
- 16 oz (2 blocks) Full-Fat Cream Cheese (softened)
- 1 cup Smooth Peanut Butter
- 1 cup Powdered Sugar (sifted)
- 1 teaspoon Vanilla Extract
- 1/2 cup Heavy Whipping Cream (cold, or 1/4 cup milk/half-and-half)
Caramel/Toffee Layer
- 1/2 cup Store-Bought Caramel Sauce (thick) OR 1/2 cup Peanut Butter Ganache
Chocolate Ganache Topping
- 6 oz (170 g) Dark Chocolate (finely chopped)
- 1/2 cup Heavy Cream
Decoration
- 1/2 cup Mini Chocolate Chips (or chocolate shavings)
Instructions
- Make the Chocolate Crumble Crust: Combine the chocolate wafer or Oreo crumbs, granulated sugar, and melted unsalted butter until the mixture is fully moistened. Press this mixture firmly into the bottom of a parchment-lined 8×8 inch pan to form the crust. Place the pan in the freezer to set while preparing the filling.
- Prepare the Peanut Butter Cheesecake Filling: In a mixing bowl, beat the softened cream cheese, smooth peanut butter, powdered sugar, and vanilla extract until the mixture is smooth and creamy. Gradually add the cold heavy whipping cream, mixing slowly until the filling becomes thick and light in texture.
- Assemble the Layers: Evenly spread the peanut butter cheesecake filling over the chilled chocolate crust. Place the pan in the refrigerator for 2 hours or freeze for 30 minutes until the filling is firm. Next, spread a thin layer of store-bought caramel sauce or homemade peanut butter ganache over the set cheesecake layer.
- Apply the Chocolate Ganache Topping: Heat the heavy cream in a saucepan until it just begins to simmer, then pour it over the finely chopped dark chocolate. Let sit for 5 minutes, then stir gently until the ganache is smooth and glossy. Allow the ganache to cool slightly before pouring it evenly over the caramel layer. Tilt the pan gently to spread it evenly. Immediately sprinkle the mini chocolate chips or chocolate shavings over the ganache. Refrigerate the bars for at least 2 hours until the ganache is set.
- Serve: Using the parchment paper, lift the bars out of the pan and cut into 16 neat squares. Optionally garnish with extra cookie crumbs or chocolate chips before serving. Enjoy these rich, layered peanut butter chocolate bars chilled.
Notes
- For a firmer crust, chill the crust in the freezer for at least 15 minutes before adding the filling.
- Use full-fat cream cheese and peanut butter for the creamiest texture and richest flavor.
- Store the bars in an airtight container in the refrigerator for up to 4 days.
- These bars can be frozen for up to 1 month; thaw in the fridge before serving.
- You can substitute peanut butter with almond or cashew butter for a different nutty flavor.
- For a gluten-free version, use gluten-free chocolate wafer crumbs.
Nutrition
- Serving Size: 1 bar (approx. 1/16th of recipe)
- Calories: 430 kcal
- Sugar: 30 g
- Sodium: 150 mg
- Fat: 32 g
- Saturated Fat: 12 g
- Unsaturated Fat: 16 g
- Trans Fat: 0 g
- Carbohydrates: 28 g
- Fiber: 2 g
- Protein: 7 g
- Cholesterol: 55 mg
Keywords: peanut butter bars, no bake dessert, chocolate ganache, caramel dessert, easy baking, homemade sweets, decadent bars, dessert lover, candy bar inspired, party food ideas, cheesecake bars, layered bars, indulgent treats, sweet obsession, dessert time, baking joy, chocolate treats, no bake goodness, celebration dessert