Butterfinger Cheesecake Recipe
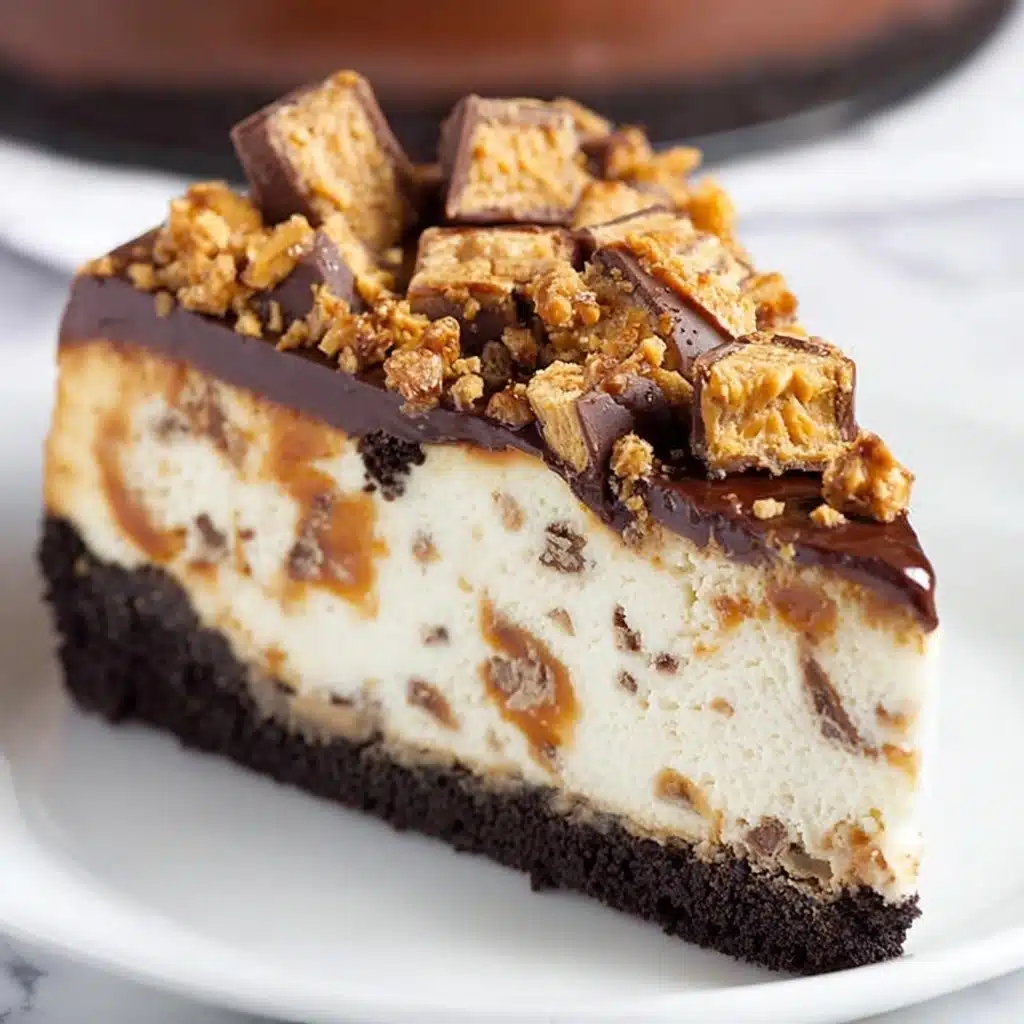
If you have a serious sweet tooth and an adoration for all things peanut buttery and chocolatey, then you are absolutely going to fall head over heels for this Butterfinger Cheesecake. This dessert is a perfect harmony of creamy, peanut buttery filling studded with crunchy Butterfinger chunks, nestled atop a crunchy Oreo crust, and finished with luscious chocolate ganache and fluffy peanut butter whipped cream. It’s the ultimate showstopper for any occasion, delivering layers of flavor and texture that keep you coming back for another slice. Trust me, once you try this Butterfinger Cheesecake, it will quickly become your new favorite indulgence to share with friends and family.

Ingredients You’ll Need
Getting your ingredients together for this Butterfinger Cheesecake is simpler than you might think, but each component plays a crucial role in creating that perfect balance of flavors and textures. From the Oreo crust that provides a chocolatey base to the rich peanut butter blended seamlessly with cream cheese, every ingredient is essential to make this cheesecake truly unforgettable.
- Oreo crumbs (2 ¼ cups or 302g): Provides a chocolatey and crumbly base with a hint of sweetness and crunch.
- Salted butter (4 tbsp or 56g), melted: Binds the Oreo crumbs together, adding richness and flavor to the crust.
- Cream cheese (24 oz or 678g), room temperature: The creamy, velvety foundation of the cheesecake filling.
- Sugar (1 cup or 207g): Sweetens the filling just enough to complement the peanut butter and chocolate elements.
- All-purpose flour (3 tbsp or 24g): Helps stabilize the cheesecake and ensures a smooth, firm texture.
- Sour cream (¾ cup or 173g), room temperature: Adds tanginess and creamy moisture for a luscious bite.
- Peanut butter (½ cup or 140g): Infuses the filling with its signature nutty flavor and creamy texture.
- Vanilla extract (1 tsp): Enhances the overall flavors and adds warm aromatics.
- Large eggs (4), room temperature: Essential for binding the filling and giving it structure.
- Chopped Butterfingers (1 ½ cups or about 12 fun-sized bars): Provides delightful crunch and an iconic peanut butter candy flavor throughout the filling.
- Semi-sweet chocolate chips (6 oz): Used to create a shiny, decadent chocolate ganache topping.
- Heavy whipping cream (½ cup for ganache, ¾ cup for whipped topping): Creates the smooth ganache and light, fluffy whipped cream topping.
- Powdered sugar (½ cup or 58g): Sweetens the peanut butter whipped cream evenly and smoothly.
- Additional chopped Butterfingers: For garnishing and adding that extra crunch on top.
How to Make Butterfinger Cheesecake
Step 1: Make the crust
Start by preheating your oven to 325°F (163°C) and preparing a 9-inch springform pan lined with parchment and greased on the sides. Combine the Oreo crumbs with the melted butter until the mixture holds together well. Press this mixture firmly into the bottom of your pan to create an even, solid base. Bake this crust for 10 minutes and then set it aside to cool. To prepare for the water bath that will bake your cheesecake evenly, wrap the outside of the pan with foil to prevent leaks.
Step 2: Prepare the cheesecake filling
Lower your oven temperature to 300°F (148°C). In a large mixing bowl, beat the room temperature cream cheese with sugar and flour on a low speed until silky smooth. Incorporate the sour cream, peanut butter, and vanilla extract, mixing gently but thoroughly. Add the eggs one at a time, making sure to combine each thoroughly but without overbeating to keep the filling light. Finally, fold in the chopped Butterfingers delicately so that chunks are evenly distributed without crushing them. Pour this luscious batter onto your cooled crust, smoothing the top gently.
Step 3: Bake the cheesecake in a water bath
Place the springform pan inside a larger roasting pan and pour hot water into the larger pan until it reaches halfway up the sides of your cheesecake pan. This water bath method ensures gentle, even cooking that prevents cracks. Bake for 1 hour and 25 minutes until the edges are set but the center still slightly jiggles. Then turn off the oven and leave the cheesecake inside with the door cracked open for 30 more minutes, allowing it to rest and set further without shocking the delicate custard. Remove the cheesecake from the oven, unwrap the foil, and chill it in the fridge for at least 5 to 6 hours or overnight for the best texture.
Step 4: Make the chocolate ganache
While the cheesecake chills, melt the semi-sweet chocolate chips in a heatproof bowl. Heat the heavy cream just until it reaches a gentle boil and pour it over the chocolate. Let it sit for a couple of minutes, then whisk until perfectly smooth and glossy. Spread this decadent ganache evenly over the chilled cheesecake for a rich chocolate finish that complements the peanut butter and Butterfinger crunch wonderfully.
Step 5: Prepare and pipe peanut butter whipped cream topping
In a clean bowl, beat the heavy whipping cream, powdered sugar, peanut butter, and vanilla extract until stiff peaks form. This whipped cream is light yet deeply flavored with peanut butter, adding an airy contrast to the dense cheesecake. Use a star piping tip to pipe generous rosettes around the edge of the cheesecake. Sprinkle additional chopped Butterfingers on top of the whipped cream for inviting crunch and a beautiful presentation.
How to Serve Butterfinger Cheesecake
Garnishes
To make each slice of Butterfinger Cheesecake look irresistible, always finish with a sprinkle of extra chopped Butterfingers and a decadent rosette of peanut butter whipped cream. A drizzle of chocolate ganache over each slice adds that final touch of elegance and extra chocolate goodness.
Side Dishes
This cheesecake is so rich and flavorful that it pairs perfectly with simple sides. Fresh berries or sliced strawberries add a bright, juicy contrast that cuts through the richness. A small scoop of vanilla bean ice cream or a dollop of extra peanut butter whipped cream complements the dessert beautifully without overwhelming the nuanced flavors.
Creative Ways to Present
Want to wow your guests? Serve your Butterfinger Cheesecake in mini springform pans or individual jars layered with more chopped Butterfingers and whipped cream for a trendy, personal touch. You can also create a striking dessert platter by topping additional slices with chocolate shards or edible gold leaf for a splash of glamour!
Make Ahead and Storage
Storing Leftovers
Butterfinger Cheesecake keeps beautifully in the refrigerator for up to 4 days when stored in an airtight container or wrapped tightly in plastic wrap. The flavors deepen over time, making every slice even more enjoyable the next day.
Freezing
If you want to save some for later, you can freeze Butterfinger Cheesecake. Wrap it carefully with plastic wrap and then aluminum foil to prevent freezer burn. It can be stored frozen for up to 2 months. Thaw it overnight in the refrigerator before serving.
Reheating
Cheesecake is best enjoyed chilled, so reheating is typically unnecessary. However, if you prefer it slightly warmer, let it come to room temperature for about 30 minutes before slicing. Avoid microwaving as it may alter the texture.
FAQs
Can I use crunchy peanut butter instead of smooth?
Absolutely! Using crunchy peanut butter will add an extra layer of texture to your filling, complementing the Butterfinger chunks nicely. Just be sure to mix well so it disperses evenly.
Can I make this cheesecake nut-free by substituting peanut butter?
Since peanut butter is a key flavor here, it would be difficult to replace without losing the defining taste. However, you could try sunflower seed butter as a nut-free alternative, keeping in mind the flavor profile will be different.
Do I have to use the water bath method when baking?
Using a water bath helps bake the cheesecake evenly and prevents cracks, resulting in a silky, smooth texture. Although you can bake it without one, expect a denser texture and potential cracks on top.
How do I prevent my cheesecake from cracking?
Besides using a water bath, avoid overmixing the batter and try not to open the oven door during baking. Allow the cheesecake to cool gradually in the oven with the door cracked after baking, which helps prevent cracks.
What is the best way to chop Butterfingers for the filling?
Use a sharp knife to roughly chop the Butterfinger bars into small chunks. You want pieces big enough to provide crunch but small enough to mix evenly throughout the cheesecake filling.
Final Thoughts
There is truly nothing quite like the cozy, nostalgic joy of savoring a slice of Butterfinger Cheesecake. From the rich peanut butter-infused filling studded with crunchy Butterfinger pieces to the chocolatey Oreo crust and silky ganache glaze, every bite is a delightful celebration of flavor and texture. I encourage you to dive into making this Butterfinger Cheesecake for your next special occasion or simply when you want to treat yourself to something spectacular. Once you take that first bite, I’m confident it’ll become one of your all-time favorite desserts too!
PrintButterfinger Cheesecake Recipe

This Butterfinger Cheesecake is a decadent dessert combining a crunchy Oreo crust with a creamy peanut butter-infused cheesecake filling studded with chopped Butterfinger bars. Topped with a rich chocolate ganache and peanut butter whipped cream garnished with more Butterfinger pieces, this luxurious cheesecake is perfect for special occasions and peanut butter lovers.
- Prep Time: 40 minutes
- Cook Time: 1 hour 25 minutes
- Total Time: 6 hours 35 minutes (including chilling time)
- Yield: 12–14 slices 1x
- Category: Dessert
- Method: Baking
- Cuisine: American
- Diet: Vegetarian
Ingredients
Crust
- 2 ¼ cups (302g) Oreo crumbs
- 4 tbsp (56g) salted butter, melted
Filling
- 24 oz (678g) cream cheese, room temperature
- 1 cup (207g) sugar
- 3 tbsp (24g) all-purpose flour
- ¾ cup (173g) sour cream, room temperature
- ½ cup (140g) peanut butter
- 1 tsp vanilla extract
- 4 large eggs, room temperature
- 1 ½ cups (12 fun-sized bars) chopped Butterfingers
Chocolate Ganache
- 6 oz semi-sweet chocolate chips
- ½ cup heavy whipping cream
Peanut Butter Whipped Cream
- ¾ cup heavy whipping cream
- ½ cup (58g) powdered sugar
- 2 tbsp (35g) peanut butter
- ¼ tsp vanilla extract
- Chopped Butterfingers for garnish
Instructions
- Make the crust: Preheat the oven to 325°F (163°C). Line a 9-inch springform pan with parchment paper on the bottom and grease the sides. Combine Oreo crumbs with melted butter until evenly moistened. Press this mixture firmly into the bottom of the pan to form an even crust layer. Bake for 10 minutes, then remove and allow to cool. Wrap the outside of the pan with foil to prepare it for a water bath in the next step.
- Prepare the cheesecake filling: Lower the oven temperature to 300°F (148°C). In a large mixing bowl, beat the cream cheese, sugar, and flour on low speed until the mixture is smooth and creamy. Add the sour cream, peanut butter, and vanilla extract, mixing until combined. Incorporate the eggs one at a time, mixing gently to maintain a light texture. Fold in the chopped Butterfingers carefully. Pour the batter evenly over the cooled crust in the springform pan. Place the springform pan into a larger roasting pan and add hot water to the larger pan until it reaches halfway up the sides of the springform pan, creating a water bath for even baking. Bake for approximately 1 hour and 25 minutes, or until the cheesecake is set but still slightly jiggly in the center. Turn off the oven and let the cheesecake rest inside for 30 minutes. Then crack the oven door open and let it continue to rest for another 30 minutes. Remove the cheesecake from the oven, unwrap the foil, and refrigerate for 5 to 6 hours or preferably overnight to fully set.
- Make the ganache: Place the semi-sweet chocolate chips in a heatproof bowl. Heat the heavy whipping cream until it just begins to boil, then pour it directly over the chocolate chips. Let sit for 2 to 3 minutes to allow the chocolate to melt. Whisk gently until the mixture is smooth and glossy. Spread the ganache evenly over the chilled cheesecake.
- Whip the topping: In a mixing bowl, beat the heavy whipping cream, powdered sugar, peanut butter, and vanilla extract until stiff peaks form. Using a piping bag fitted with a star tip, pipe the peanut butter whipped cream around the edge of the cheesecake. Garnish with additional chopped Butterfingers for a final touch.
Notes
- Using room temperature ingredients ensures a smooth, lump-free cheesecake batter.
- Be careful not to overbake the cheesecake; it should be slightly jiggly in the center to prevent cracking.
- Wrap the springform pan in foil securely to avoid water leaking into the crust during the water bath.
- Allow the cheesecake to chill overnight for the best texture and flavor development.
- You can substitute Oreo crumbs with other chocolate cookie crumbs if desired.
- Store leftover cheesecake in the refrigerator tightly covered for up to 4 days.
Nutrition
- Serving Size: 1 slice (approx. 1/12th of cake)
- Calories: 510 kcal
- Sugar: 38 g
- Sodium: 280 mg
- Fat: 35 g
- Saturated Fat: 15 g
- Unsaturated Fat: 16 g
- Trans Fat: 0.5 g
- Carbohydrates: 40 g
- Fiber: 2 g
- Protein: 8 g
- Cholesterol: 125 mg
Keywords: Butterfinger cheesecake, peanut butter cheesecake, Oreo crust cheesecake, chocolate ganache cheesecake, peanut butter whipped cream