Chocolate Lava Brownie Cookies Recipe
“`html
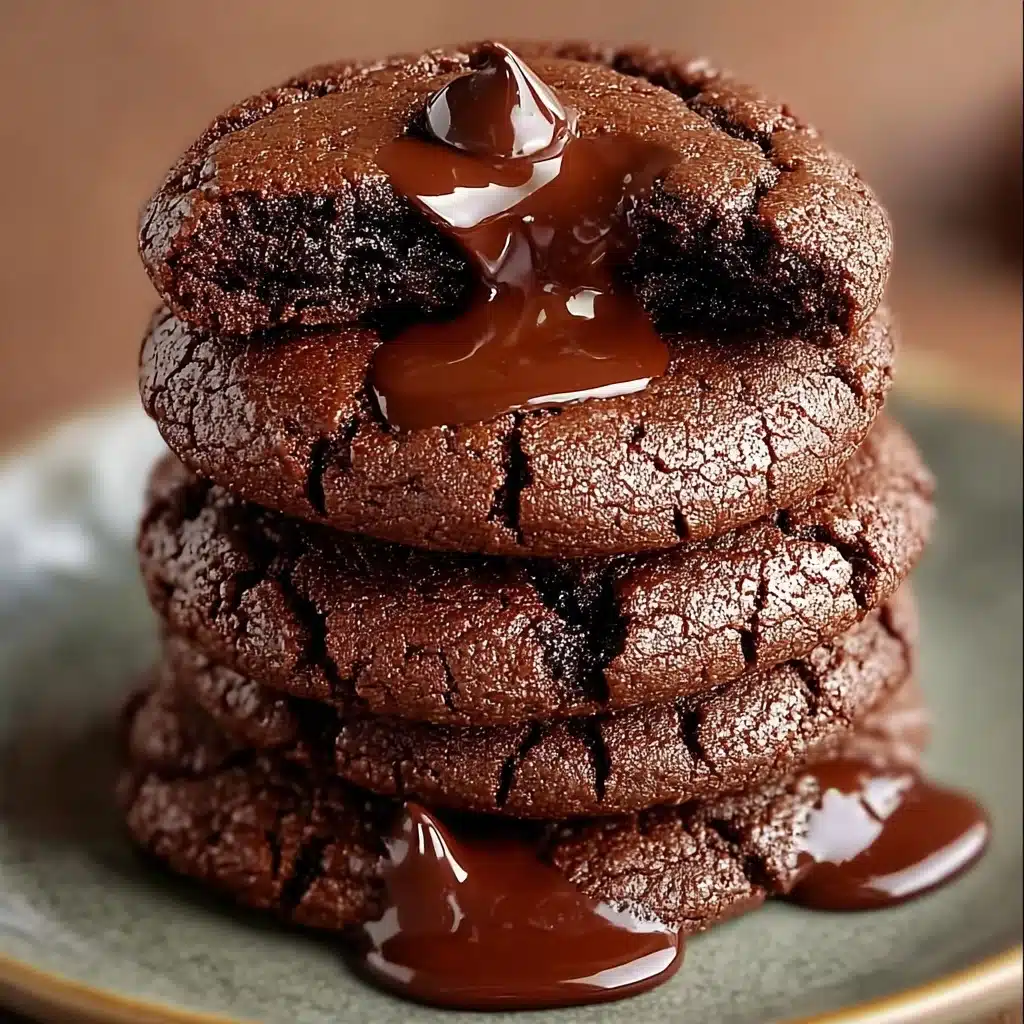
If you have a serious sweet tooth and adore chocolate in all its melty, gooey glory, then you absolutely must try these Chocolate Lava Brownie Cookies. They are the perfect marriage of fudgy brownie richness and the comforting, chewy texture of cookies, with a secret molten chocolate center that oozes out to make every bite an explosion of pure delight. Whether you’re baking for a special occasion or just craving a decadent treat to brighten your day, these cookies deliver an irresistible chocolate experience that feels like a warm hug in dessert form.
Ingredients You’ll Need
The beauty of this recipe lies in its simplicity and the quality of its ingredients. Each one plays a crucial role—from the deep cocoa flavor to the soft, chewy texture and that luscious lava center that sets these cookies apart.
- Semi-sweet chocolate chips: Essential for the rich, chocolatey base and melting beautifully with the butter.
- Unsalted butter: Adds tenderness and helps the dough hold together perfectly.
- Granulated sugar: Provides sweetness and helps with the subtle crisp edges.
- Brown sugar, packed: Adds moisture and a lovely caramel undertone for depth of flavor.
- Large eggs: Bind the ingredients together and create a soft, chewy texture.
- Vanilla extract: Enhances the chocolate’s richness with a warm aromatic note.
- All-purpose flour: Provides structure so the cookies hold their shape but stay tender.
- Unsweetened cocoa powder: Boosts the chocolate flavor with a robust, slightly bitter punch.
- Baking powder: Gives the cookies a slight lift without making them cakey.
- Salt: Balances sweetness and intensifies all chocolate flavors.
- Mini chocolate chips or chunks: Adds bursts of melty chocolate in every bite.
- Gooey chocolate truffle or fudge filling (optional): The star ingredient for the molten lava surprise inside.
How to Make Chocolate Lava Brownie Cookies
Step 1: Preheat and Prepare
Start by heating your oven to 350°F (175°C). Line a baking sheet with parchment paper or a silicone baking mat to keep your cookies from sticking and ensure easy cleanup. This simple prep step sets the stage for perfect baking every time.
Step 2: Melt the Chocolate and Butter
Combine the semi-sweet chocolate chips and unsalted butter in a microwave-safe bowl. Heat in 30-second intervals, stirring after each, until completely melted and smooth. Allow the mixture to cool slightly so it won’t cook the eggs when combined in the next step.
Step 3: Whisk Together Wet Ingredients
In a separate bowl, beat the granulated sugar, brown sugar, eggs, and vanilla extract until the mixture is smooth and slightly creamy. This mixture is the sweet, rich foundation that will bring everything together.
Step 4: Combine the Chocolate with the Sugars and Eggs
Slowly fold the melted chocolate and butter mixture into your wet ingredients, blending everything into one delicious, glossy batter. Taking your time here helps maintain the perfect consistency.
Step 5: Mix in Dry Ingredients
In another bowl, sift the all-purpose flour, cocoa powder, baking powder, and salt to avoid lumps and evenly distribute your leavening. Gradually add this dry mix to the chocolatey wet base, stirring carefully until you have a luscious dough taking shape.
Step 6: Fold in Extra Chocolate Chips
Gently fold in the mini chocolate chips or chunks for an extra dose of melty chocolate that will surprise you in every bite. These add texture and keep things delightfully gooey.
Step 7: Form the Cookies with the Lava Center
Scoop out tablespoon-sized portions of dough and roll them into balls. If you’re going all-in with the molten magic, press a small hollow in the center of each ball and spoon in a bit of the chocolate truffle or fudge filling. Carefully seal the dough around the filling so it’s hidden inside, ready to burst out when baked.
Step 8: Bake to Gooey Perfection
Place your cookie dough balls on the lined baking sheet, leaving about two inches between each to allow room for spreading. Bake for 8 to 10 minutes, just until the edges are set but the centers still look soft. The cookies will continue to firm up as they cool, but keep that lava center warm for maximum indulgence.
Step 9: Cool, Then Enjoy!
Let your cookies cool slightly on the baking sheet for a few minutes before transferring them to a wire rack. Serving these warm ensures you get the full effect of the molten lava inside, making every bite a decadent delight.
How to Serve Chocolate Lava Brownie Cookies

Garnishes
Adding a dusting of powdered sugar or a drizzle of chocolate ganache on top elevates their presentation and adds even more sweetness. A sprinkle of flaky sea salt can also be fantastic, creating a savory contrast that makes the chocolate flavor pop even more.
Side Dishes
Pair these gooey treats with a scoop of vanilla ice cream or a generous dollop of whipped cream. The cold creaminess against the warm molten center creates an irresistible contrast of textures and temperatures that will have you reaching for seconds.
Creative Ways to Present
Try serving your Chocolate Lava Brownie Cookies on a platter alongside fresh berries and mint leaves for a pop of color and freshness. Or stack them with layers of chocolate mousse or pudding cups to create a beautifully decadent dessert platter perfect for sharing.
Make Ahead and Storage
Storing Leftovers
Once fully cooled, store your leftover cookies in an airtight container at room temperature. They’ll stay soft and delicious for about 3 to 4 days — perfect for quick indulgences after a busy day.
Freezing
If you want to savor these treats later, freeze the dough balls before baking by placing them on a baking sheet and then transferring to a freezer-safe bag once solid. They will keep well for up to 3 months and can be baked straight from frozen with just a minute or two added to the baking time.
Reheating
To enjoy the full lava effect, gently reheat baked cookies in the microwave for 15 to 20 seconds. This revives the gooey center and softness, as if they were freshly baked.
FAQs
Can I make Chocolate Lava Brownie Cookies without the lava center?
Absolutely! The cookies are delicious even without the fudge or truffle filling. They still have rich chocolate flavor and chewy brownie texture, but the lava center adds an extra decadent surprise if you want to go all out.
What’s the best chocolate to use for these cookies?
Semi-sweet chocolate chips work perfectly because they balance sweetness with deep chocolate flavor. For extra indulgence, use high-quality chocolate chips or chunks, and don’t skip the cocoa powder for that intense brownie taste.
Can I substitute the butter with something else?
Unsalted butter is recommended for flavor and texture, but you can try melted coconut oil or a neutral oil in equal amounts if you need a dairy-free option. Just keep in mind it might slightly change the texture.
How do I know when the cookies are done baking?
Look for edges that are set and slightly crisp while the centers still appear soft and a bit underdone. This ensures you get that perfect chewy exterior with a gooey molten center.
Can these cookies be made gluten-free?
Yes, you can substitute the all-purpose flour with a gluten-free flour blend that measures cup-for-cup. Just make sure it contains xanthan gum or another binder for best results.
Final Thoughts
These Chocolate Lava Brownie Cookies are an absolute game-changer when it comes to chocolate desserts. They combine the best parts of brownies and cookies, with that magical molten center that makes your taste buds sing. I encourage you to bake a batch soon—whether for yourself or to impress friends, these cookies are sure to become a beloved classic in your recipe collection!
“`
PrintChocolate Lava Brownie Cookies Recipe

These decadent Chocolate Lava Brownie Cookies combine the rich, gooey center of a lava cake with the chewy texture of a brownie cookie, making them the perfect indulgent treat for chocolate lovers. Featuring a molten chocolate core hidden inside a soft, fudgy cookie, they are ideal for serving warm and fresh from the oven.
- Prep Time: 15 minutes
- Cook Time: 10 minutes
- Total Time: 25 minutes
- Yield: Approximately 18 cookies 1x
- Category: Dessert, Cookies
- Method: Baking
- Cuisine: American
- Diet: Vegetarian
Ingredients
Chocolate Base
- 1 cup semi-sweet chocolate chips
- 1/2 cup unsalted butter
Sugars and Wet Ingredients
- 1/4 cup granulated sugar
- 1/4 cup brown sugar, packed
- 2 large eggs
- 1 tsp vanilla extract
Dry Ingredients
- 1/2 cup all-purpose flour
- 1/4 cup unsweetened cocoa powder
- 1/2 tsp baking powder
- 1/4 tsp salt
Chocolate Add-ins
- 1 cup mini chocolate chips (or chocolate chunks)
- 1/2 cup gooey chocolate truffle or chocolate fudge filling (optional for lava center)
Instructions
- Preheat the Oven: Preheat your oven to 350°F (175°C) and line a baking sheet with parchment paper or a silicone baking mat to prevent sticking and ensure even baking.
- Melt the Chocolate: In a microwave-safe bowl, combine the semi-sweet chocolate chips and unsalted butter. Heat in 30-second intervals, stirring well between each, until the mixture is smooth and fully melted. Allow it to cool slightly to avoid cooking the eggs later.
- Mix Wet Ingredients: In a separate bowl, whisk together the granulated sugar, brown sugar, eggs, and vanilla extract until the mixture is smooth, creamy, and slightly thickened.
- Combine: Gradually pour the melted chocolate and butter mixture into the sugar and egg mixture, stirring constantly until all ingredients are fully incorporated and uniform in texture.
- Dry Ingredients: Sift together the all-purpose flour, unsweetened cocoa powder, baking powder, and salt in another bowl to remove lumps. Slowly add this dry mixture into the wet mixture, folding gently until just combined to maintain a fudgy texture.
- Add Mini Chocolate Chips: Fold in the mini chocolate chips or chunks to distribute small bursts of chocolate flavor throughout the cookie dough.
- Form the Cookies: Using a tablespoon or cookie scoop, portion out dough balls. If using the gooey chocolate truffle or fudge filling, create a small indentation in the center of each dough ball and add a spoonful of the filling. Carefully seal the dough around the center so the filling is completely enclosed.
- Bake: Arrange the cookie dough balls on the prepared baking sheet, spacing them about 2 inches apart to allow spreading. Bake in the preheated oven for 8-10 minutes, or until the edges appear set but the centers remain slightly soft and underbaked for the perfect molten center.
- Cool and Serve: Let the cookies rest on the baking sheet for a few minutes to firm up slightly, then transfer them to a wire rack. Serve warm to enjoy the luscious, gooey lava center at its best.
Notes
- For a more intense chocolate flavor, use high-quality semi-sweet chocolate chips and cocoa powder.
- Ensure the melted chocolate mixture cools before mixing with eggs to prevent scrambling.
- The optional truffle or fudge filling adds a dramatic lava effect but can be omitted for simpler cookies.
- Do not overbake cookies; they should be soft in the center to retain the lava texture.
- Store cooled cookies in an airtight container at room temperature for up to 3 days or freeze for longer storage.
- Reheat in a microwave briefly before serving to revive the gooey inner center.
Nutrition
- Serving Size: 1 cookie (approx. 40g)
- Calories: 210 kcal
- Sugar: 18 g
- Sodium: 100 mg
- Fat: 13 g
- Saturated Fat: 7 g
- Unsaturated Fat: 5 g
- Trans Fat: 0 g
- Carbohydrates: 24 g
- Fiber: 2 g
- Protein: 2 g
- Cholesterol: 50 mg
Keywords: Chocolate Lava Brownie Cookies, molten chocolate cookies, gooey chocolate cookies, fudgy chocolate cookies, chocolate dessert, easy chocolate cookies