Creamy Biscoff Dream Cheesecake with Buttery Cookie Crust Recipe
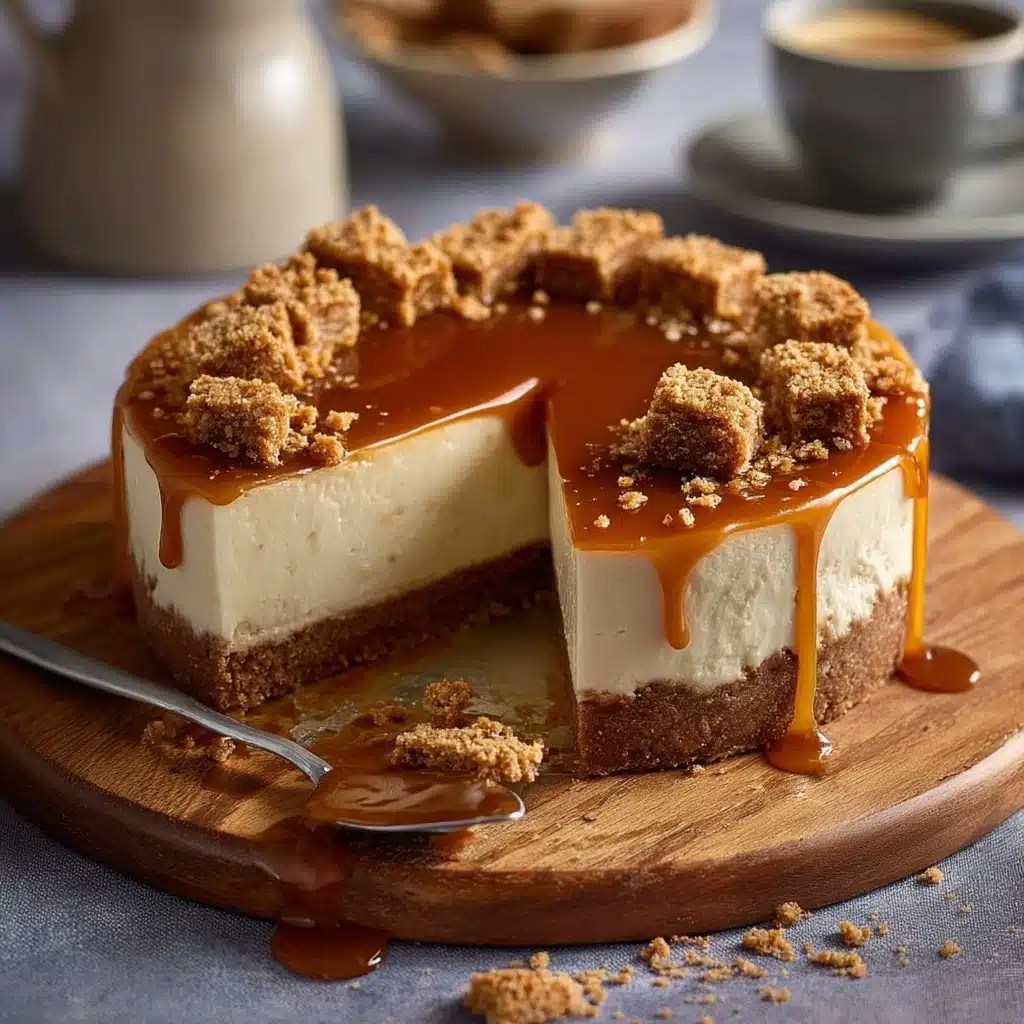
If you’re chasing a dessert that feels like a warm, sweet hug and just happens to wow a crowd, you’re about to fall hard for this Creamy Biscoff Dream Cheesecake with Buttery Cookie Crust. Imagine a lush, no-bake cheesecake with gentle notes of caramel and cinnamon, perched atop the most irresistible, melt-in-the-mouth Biscoff cookie crust. Crowned with a drizzle of velvety Biscoff spread and playful cookie crumbles, this cheesecake is pure bliss from bottom to top. It’s show-stopping yet surprisingly simple—made to charm at birthdays, holidays, or every random Thursday when you need something extraordinary.
Ingredients You’ll Need
Ingredients You’ll Need
The beauty of this Creamy Biscoff Dream Cheesecake with Buttery Cookie Crust is all in the handful of ingredients that work together so harmoniously. Each one brings something special—whether that’s creamy smoothness, a whisper of spice, or a just-right balance of sweetness and crunch.
- Lotus Biscoff cookies (300g): The soul of your cookie crust—crushed into golden, crisp crumbs that taste like a tender cookie hug.
- Unsalted butter (150g), melted: This is what binds the cookie crumbs into a buttery, unforgettable crust—the flavor really shines here.
- Cream cheese (500g), softened: Luxuriously creamy and tangy, it’s the base for our dreamy filling—be sure it’s room temperature for extra silkiness.
- Powdered sugar (100g): This dissolves instantly, giving the cheesecake a melt-in-your-mouth sweetness without any graininess.
- Heavy cream (300ml), chilled: Whipped to gentle peaks, this adds airy lightness to the filling and helps it hold its shape.
- Lotus Biscoff spread, smooth (200g + 50g extra): Brings that unmistakable spiced warmth; the extra portion is perfect for drizzling and making the top glisten temptingly.
- Biscoff cookies (4–5, for garnish): Crushed or whole, these finish the cheesecake with a lovely contrast in texture and that “wow” factor.
How to Make Creamy Biscoff Dream Cheesecake with Buttery Cookie Crust
Step 1: Prep the Crust
Start by transforming those magical Biscoff cookies into fine crumbs, either with a food processor or the satisfying smash of a rolling pin. This is where the rich, caramel-like aroma kicks in and teases what’s to come. Mix your crumbs with melted butter, making sure each crumb is fully coated, then firmly press the mixture into the base of a 9-inch springform pan. This will be the golden, buttery foundation for your Creamy Biscoff Dream Cheesecake with Buttery Cookie Crust. A quick 30-minute chill in the fridge helps set the crust perfectly.
Step 2: Whip Up the Filling
In a large mixing bowl, beat your softened cream cheese and powdered sugar together until perfectly smooth—no lumps allowed! In another bowl, whip your chilled heavy cream until soft, billowy peaks form (don’t overdo it—soft and swoopy is ideal). Gently fold your whipped cream into the cream cheese mixture, keeping it light and airy.
Step 3: Add the Biscoff Magic
Slightly warm 200g of Biscoff spread in the microwave for about 15 seconds to make it extra pourable. Fold this golden goodness into your cheesecake base until the color is uniform and the aroma is irresistible. The Biscoff flavor will now be woven through every silky bite!
Step 4: Assemble and Chill
Pour the dreamy Biscoff cheesecake mixture over your chilled cookie crust. Smooth the top with a spatula for that professional, bakery-fresh look. Now, patience: pop your cheesecake into the fridge and let it chill for at least 6 hours, or better yet, overnight. This crucial step sets the texture to creamy perfection.
Step 5: Finishing Touches
When you’re ready to serve, gently release the cheesecake from the springform pan. Warm the extra 50g of Biscoff spread, then drizzle artistically over the cheesecake top. Finish with whole or crushed Biscoff cookies for a touch of crunch and irresistible bakery-style flair. Your Creamy Biscoff Dream Cheesecake with Buttery Cookie Crust is now ready to steal the show!
How to Serve Creamy Biscoff Dream Cheesecake with Buttery Cookie Crust
Garnishes
Take things up a notch by strategically scattering crushed Biscoff cookies, extra Biscoff spread, or even a cloud of lightly whipped cream on top before serving. Each adds extra flavor and textural contrast, turning every slice into a celebration of all things Biscoff.
Side Dishes
Because the Creamy Biscoff Dream Cheesecake with Buttery Cookie Crust is so luxuriously rich, it pairs beautifully with a steaming cup of espresso, a glass of cold milk, or even a tart homemade berry compote. These simple additions offer a lovely balance and make for an unforgettable dessert moment.
Creative Ways to Present
Turn slices into a plated masterpiece by drizzling with caramel sauce, sprinkling with cinnamon, or adding fresh berries for a pop of color. Try making mini cheesecakes in jars for picnics, or cut the cake into squares and serve them on a dessert board for a modern, shareable twist. The possibilities are as dreamy as the cheesecake itself!
Make Ahead and Storage
Storing Leftovers
Once everyone’s had their fill, cover the leftover Creamy Biscoff Dream Cheesecake with Buttery Cookie Crust tightly with plastic wrap or pop it in an airtight container. It keeps well in the fridge for three to four days—if you can resist sneaking a slice before then!
Freezing
Need to make it a week or two ahead? No problem. Simply wrap the fully chilled cheesecake (whole or in slices) securely in clingfilm and a layer of foil. Freeze for up to one month. Thaw overnight in the refrigerator before serving—it will taste just as creamy and decadent as the day you made it.
Reheating
This dreamy cheesecake is served chilled, so there’s no need for reheating. If it’s coming straight from the freezer, let it defrost gently in the fridge for the best texture and flavor. Quick tip: Don’t microwave, or the creamy layers may lose their signature texture.
FAQs
Can I use a different brand of cookie for the crust?
While nothing beats the caramelized, spiced flavor of Biscoff cookies in the crust, you can substitute with another spiced biscuit or graham crackers if needed. Just keep in mind, it will change the flavor profile and uniqueness of your Creamy Biscoff Dream Cheesecake with Buttery Cookie Crust.
How do I know when the cheesecake is set?
A properly chilled no-bake cheesecake will be firm to the touch and slice cleanly. Chilling for at least 6 hours (or overnight) is key to ensuring your Creamy Biscoff Dream Cheesecake with Buttery Cookie Crust is sliceable and holds its dreamy shape.
Can I make this cheesecake gluten-free?
Absolutely! Simply swap out the Biscoff cookies for your favorite gluten-free spiced cookies, and double-check that your spread is gluten-free. The rest of the recipe remains gloriously the same.
What’s the best way to slice the cheesecake cleanly?
For perfect slices, dip a sharp knife in hot water, wipe it dry, and cut—cleaning the knife between cuts. This keeps the creamy filling and the Buttery Cookie Crust looking flawless with each piece.
Can I add chocolate or other flavors?
Definitely! Swirl in a little melted milk chocolate or a layer of dulce de leche before setting, top with chopped nuts, or even fold in extra spices for a personal twist. The Creamy Biscoff Dream Cheesecake with Buttery Cookie Crust is a fabulous canvas for your sweet creativity.
Final Thoughts
One taste of this Creamy Biscoff Dream Cheesecake with Buttery Cookie Crust and you’ll see why it’s a go-to favorite in my kitchen. Creamy, decadent, and always a showstopper, this cheesecake was made for sharing and making memories. Gather your ingredients and get ready to create something truly special—you’re just a few steps away from dessert bliss!
PrintCreamy Biscoff Dream Cheesecake with Buttery Cookie Crust Recipe
Indulge in the creamy decadence of this dreamy no-bake Biscoff cheesecake with a buttery cookie crust. Perfect for satisfying your sweet tooth cravings!
- Prep Time: 20 minutes
- Cook Time: 0 minutes
- Total Time: 6 hours 20 minutes (including chilling)
- Yield: 12 slices 1x
- Category: Dessert
- Method: Mixing, Chilling
- Cuisine: American
- Diet: Vegetarian
Ingredients
For the Crust:
- 300g Lotus Biscoff cookies
- 150g unsalted butter, melted
For the Filling:
- 500g cream cheese, softened
- 100g powdered sugar
- 300ml heavy cream, chilled
- 200g Lotus Biscoff spread (smooth)
- 50g extra Biscoff spread (for drizzle)
- 4–5 Biscoff cookies (for garnish)
Instructions
- Crush the Biscoff cookies: Use a food processor or place cookies in a ziplock bag and crush into fine crumbs.
- Mix crust ingredients: Combine cookie crumbs with melted butter until fully coated.
- Prepare crust: Press mixture into a 9-inch springform pan’s base and chill for 30 minutes.
- Make filling: Beat cream cheese and sugar until smooth. Whip cream separately until soft peaks form.
- Combine filling: Fold whipped cream into cream cheese mixture. Warm 200g Biscoff spread and fold into the mixture.
- Assemble cheesecake: Pour mixture over chilled crust, smoothing the top. Chill for at least 6 hours.
- Final touches: Warm extra Biscoff spread, drizzle over the top, and garnish with Biscoff cookies before serving.
Nutrition
- Serving Size: 1 slice
- Calories: 435 kcal
- Sugar: 25g
- Sodium: 290mg
- Fat: 32g
- Saturated Fat: 18g
- Unsaturated Fat: 11g
- Trans Fat: 0g
- Carbohydrates: 34g
- Fiber: 1g
- Protein: 4g
- Cholesterol: 85mg
Keywords: #nobakecheesecake #biscoffcheesecake #cookiecrust #easycheesecake #nobakedessert #biscofflove #lotusbiscoff #creamydessert #sweettoothfix #dessertgoals #homemadecheesecake #cookiecrumbcrust #easybakingathome #decadentdessert #simplecheesecake #desserttableideas #chilleddessert #coffeebreaktreat #cookiespread #noovenneeded