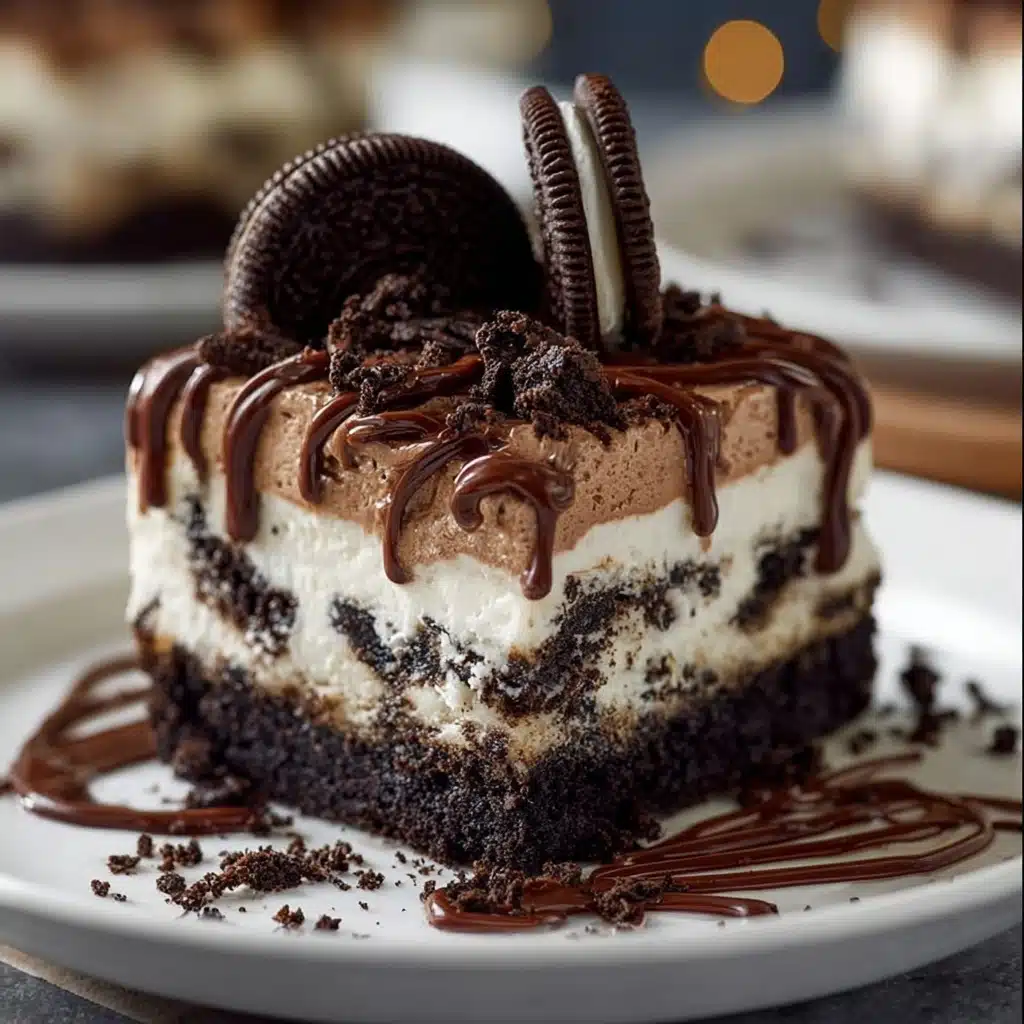
Creamy No-Bake Oreo Bliss with Chocolate & Vanilla Layers Recipe
There’s simply no resisting the charm of Creamy No-Bake Oreo Bliss with Chocolate & Vanilla Layers—each spoonful delivers luscious chocolate, dreamy vanilla, and that unforgettable Oreo crunch. If you love desserts that are easy to make, visually striking, and absolutely decadent, this is your next go-to treat. Layers of pudding, cream, and cookie come together without even turning on the oven, giving you a foolproof, crowd-pleasing dessert you’ll be excited to whip up time and again.
Ingredients You’ll Need
What makes this dessert so magical is how just a handful of familiar ingredients transform into pure bliss. Each one plays its part, from providing structure to boosting flavor or simply adding that show-stopping finishing touch.
- Oreo Cookies: These chocolate sandwich cookies set the stage for the dessert, forming a rich, crunchy base and the perfect finishing sprinkle on top.
- Unsalted Butter: The secret to a delectable crust that holds together yet melts in your mouth—be sure to melt it first for easy mixing.
- Cream Cheese: Softened cream cheese adds a tangy, creamy layer that balances all the sweetness and keeps things irresistibly smooth.
- Powdered Sugar: A little sweetness goes a long way in the creamy filling, dissolving easily for a velvety texture.
- Whipped Topping (Cool Whip): This light and fluffy component helps each layer stay airy and perfectly delicious.
- Instant Chocolate Pudding Mix: The shortcut to deep chocolatey flavor—make sure you use instant for quick thickening and layering.
- Milk: Ice cold milk is key for mixing up pudding that’s silky and thick.
- Extra Oreos (Optional): Go the extra mile for presentation by finishing things off with extra cookie halves or crumbles.
How to Make Creamy No-Bake Oreo Bliss with Chocolate & Vanilla Layers
Step 1: Make the Oreo Crust
Grab your 9×13-inch dish—it’s about to become home to greatness! In a bowl, blend the crushed Oreos (save one cup for later) with melted butter until the mixture looks like rich, edible sand. Press this firmly into the bottom of the dish, creating a uniform crust. It should feel dense but inviting, promising chocolate in every bite.
Step 2: Whip Up the Cream Cheese Layer
Using a handheld mixer or a sturdy whisk, beat the softened cream cheese together with the powdered sugar until the mixture is silky, lump-free, and feels like dessert in its own right. Add in half the whipped topping by folding gently—you want to keep all that fluffy texture alive! Spread this smooth vanilla layer over the prepared Oreo crust.
Step 3: Prepare the Chocolate Pudding
Pour both chocolate pudding mixes into a large bowl, add the cold milk, and whisk vigorously for a couple of minutes. Watch as it magically thickens—this is where the chocolate layer gets its dreamy texture. Spread the pudding gently over the cream cheese layer, taking care to keep that beautiful separation.
Step 4: Add Whipped Topping and Oreo Crumble
It’s time for a crowning touch! Spoon and spread the remaining whipped topping over the pudding. Once it’s nice and smooth, take that cup of reserved crushed Oreos and scatter them all over the top. This adds a pop of dark color and an irresistible crunch, turning your Creamy No-Bake Oreo Bliss with Chocolate & Vanilla Layers into a ready-to-wow centerpiece.
Step 5: Chill and Serve
Cover the entire dish snugly and refrigerate for at least 4 hours—overnight is even better if you can wait! This patience lets the layers set together, giving you those perfect creamy squares. Once chilled, slice, serve, and enjoy a little piece of bliss in every bite.
How to Serve Creamy No-Bake Oreo Bliss with Chocolate & Vanilla Layers

Garnishes
Give your dessert that extra sparkle with some whole mini Oreos perched on top, a light dusting of cocoa powder, or a drizzle of chocolate sauce over each slice. These classy touches turn Creamy No-Bake Oreo Bliss with Chocolate & Vanilla Layers into something truly special that deserves a place at the dessert table.
Side Dishes
Since this treat is quite rich, balance it with a fresh fruit platter—think strawberries, raspberries, or even sliced bananas. A scoop of vanilla ice cream can double the fun, while a small glass of cold milk or robust coffee pairs beautifully to round out your dessert experience.
Creative Ways to Present
If you want to wow guests, try assembling Creamy No-Bake Oreo Bliss with Chocolate & Vanilla Layers in individual mason jars or clear parfait glasses. Layer as directed for a grab-and-go option splendid for parties or potlucks. You can also use cookie cutters to create fun shapes from the set dessert for a playful twist at holidays or birthdays.
Make Ahead and Storage
Storing Leftovers
Leftover squares keep wonderfully when tightly covered and refrigerated for up to 4 days. The layers may mellow together a bit, but Creamy No-Bake Oreo Bliss with Chocolate & Vanilla Layers holds its charm, making it easy to serve up a quick treat whenever cravings strike.
Freezing
You can freeze this dessert (without the garnish) for up to a month! Wrap the pan well in plastic and aluminum foil, or portion into airtight containers. Thaw overnight in the fridge for best texture, then garnish freshly before serving.
Reheating
You won’t need any reheating—Creamy No-Bake Oreo Bliss with Chocolate & Vanilla Layers is at its best when served cold straight from the fridge. If frozen, let thaw gently in the refrigerator for several hours or overnight to bring back its creamy magic.
FAQs
Can I use homemade whipped cream instead of Cool Whip?
Absolutely! Substitute an equal amount of freshly whipped cream, just be sure it’s whipped to soft peaks and very stable so the layers stay put. It’ll give the dessert an even richer, homemade flavor.
What’s the best way to crush Oreos for the crust?
A food processor is quickest for turning Oreos into fine crumbs, but a rolling pin and a zip-top bag work perfectly if you prefer a chunkier texture in your crust. Just make sure to crush them evenly for that classic base.
Can I make Creamy No-Bake Oreo Bliss with Chocolate & Vanilla Layers gluten-free?
Yes! Simply use gluten-free chocolate sandwich cookies in place of traditional Oreos and double-check that your pudding mix is gluten-free. The taste and texture are equally delightful.
How far ahead can I make this dessert?
You can assemble the whole dessert up to 2 days before serving. Just keep it covered and refrigerated, and add any fresh garnishes right before you’re ready to slice and serve.
Can I use a different pudding flavor for the chocolate layer?
Definitely—while chocolate is a classic, feel free to try vanilla, cheesecake, or even cookies and cream instant pudding mix for a unique spin on this blissful treat.
Final Thoughts
There’s really nothing quite like the layers of creamy, chocolatey, cookie-filled goodness in Creamy No-Bake Oreo Bliss with Chocolate & Vanilla Layers. I hope you give this recipe a try, share it with friends and family, and create sweet new memories around every delicious bite!
PrintCreamy No-Bake Oreo Bliss with Chocolate & Vanilla Layers Recipe

Indulge in the delightful Creamy No-Bake Oreo Bliss with alternating layers of chocolate and vanilla, creating a rich and satisfying dessert experience.
- Prep Time: 20 minutes
- Cook Time: 0 minutes
- Total Time: 4 hours 20 minutes
- Yield: 12 servings 1x
- Category: Dessert
- Method: No-Bake
- Cuisine: American
- Diet: Vegetarian
Ingredients
Oreo Crust:
- 1 package (14.3 oz) Oreo cookies, crushed (reserve 1 cup for topping)
- 1/2 cup unsalted butter, melted
Cream Cheese Layer:
- 1 package (8 oz) cream cheese, softened
- 1 cup powdered sugar
- 1 tub (8 oz) whipped topping (Cool Whip), thawed, divided
Chocolate Pudding Layer:
- 2 packages (3.9 oz each) instant chocolate pudding mix
- 3 cups cold milk
Optional Garnish:
- Extra Oreos for garnish
Instructions
- Oreo Crust: Combine crushed Oreos (except reserved 1 cup) with melted butter. Press into a 9×13-inch dish for the crust.
- Cream Cheese Layer: Beat cream cheese and powdered sugar until smooth. Fold in half of the whipped topping and spread over the Oreo crust.
- Chocolate Pudding Layer: Whisk chocolate pudding mix with cold milk until thickened. Spread over the cream cheese layer.
- Assembly: Top with remaining whipped topping and sprinkle reserved crushed Oreos on top.
- Chill: Cover and refrigerate for at least 4 hours (preferably overnight) before serving.
Notes
- For best results, allow the dessert to set in the refrigerator to achieve the perfect creamy texture.
- You can customize this dessert by adding your favorite toppings or drizzles.
Nutrition
- Serving Size: 1 serving
- Calories: 310 kcal
- Sugar: 24g
- Sodium: 370mg
- Fat: 18g
- Saturated Fat: 10g
- Unsaturated Fat: 6g
- Trans Fat: 0g
- Carbohydrates: 33g
- Fiber: 1g
- Protein: 4g
- Cholesterol: 25mg
Keywords: Oreo Bliss, No-Bake Dessert, Chocolate Pudding, Cream Cheese, Easy Dessert Recipe