Homemade Buster Bar Ice Cream Cake** Recipe
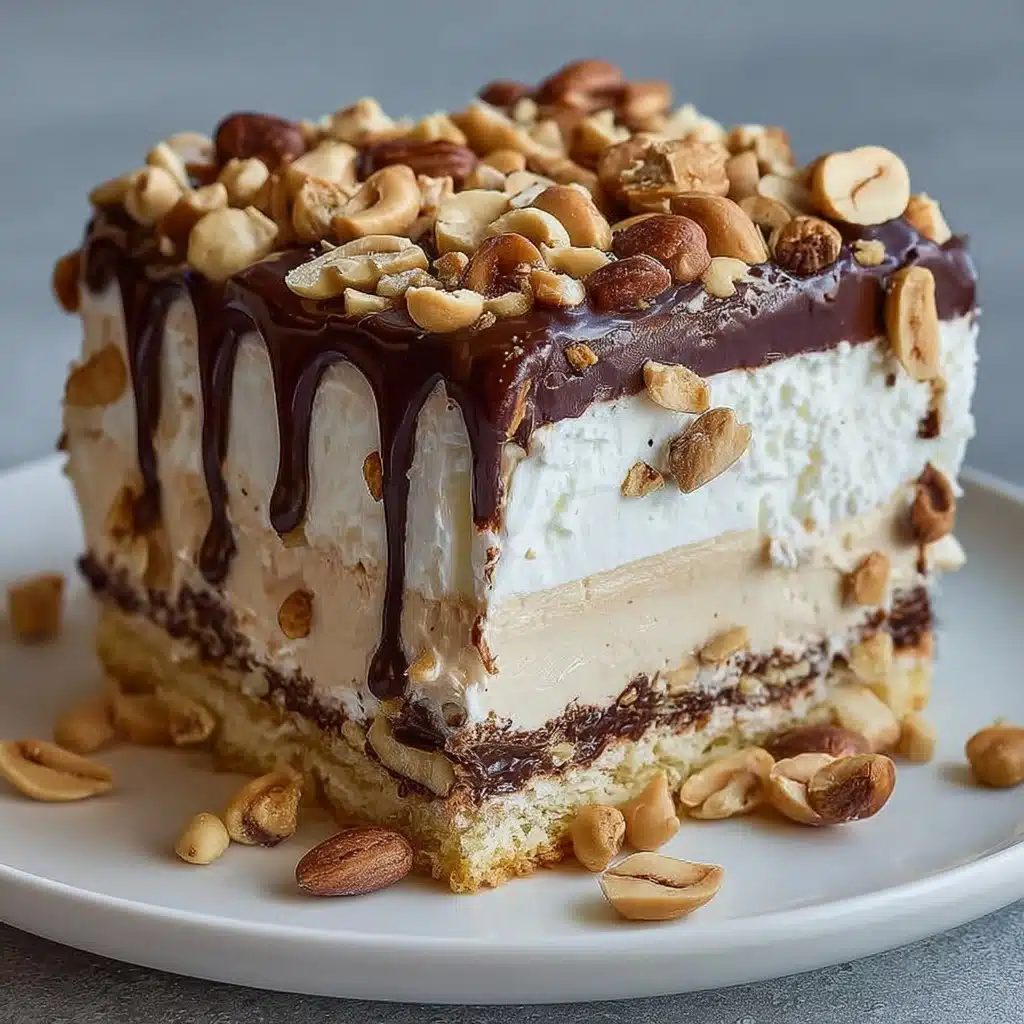
If you’ve ever craved the nostalgic magic of a Dairy Queen Buster Bar but wished you could make a show-stopping dessert at home, this Homemade Buster Bar Ice Cream Cake is the answer to your ice cream dreams! With its thick, crunchy cookie crumb crust, swoops of creamy vanilla ice cream, ribbons of gooey chocolate fudge, and a salty shower of crunchy roasted peanuts, every bite is a celebration of sweet cold indulgence. The best part? This cake is jaw-droppingly impressive, yet surprisingly fun and easy to assemble—ideal for a summer get-together, a birthday, or any night you want an epic treat.
Ingredients You’ll Need
You might be surprised at how straightforward the ingredients list is for this ice cream cake—just a handful of pantry staples, plus vanilla ice cream and a few special touches, come together for maximum flavor and texture. Every item here plays a starring role, so don’t skip a thing!
- Chocolate sandwich cookies (like Oreos) or graham crackers: These form the deeply chocolatey, crunchy base that holds the cake together and adds delightful texture.
- Unsalted butter: This gets melted and mixed with the cookie crumbs to bind the crust and add rich flavor.
- Unsweetened cocoa powder: Choose a good-quality brand for the fudge sauce—you’ll taste the difference!
- Granulated sugar: Necessary for sweetening the homemade fudge sauce just right.
- Heavy cream: Lush heavy cream gives the fudge that silky, pourable texture and decadent mouthfeel.
- Vanilla extract: A splash of vanilla turns the fudge from good to irresistible.
- Pinch of salt: Enhances all the rich chocolate and sweet flavors, making the fudge sing.
- Vanilla ice cream: The star of the show! Using a creamy, good-quality vanilla makes all the difference in your layers.
- Roasted salted peanuts (or mixed nuts): Chopped peanuts give the cake its signature crunch and a delicious salty contrast.
- Optional whipped cream or Cool Whip: Perfect for prettying up the finished cake with swoops and swirls.
How to Make Homemade Buster Bar Ice Cream Cake
Step 1: Create the Cookie Crust
Start by lightly greasing a 9×13 inch baking dish (or 8×8 for a taller cake) so nothing sticks. Crush your cookies or graham crackers until they’re like fine sand—you can use a food processor or just a sturdy ZIP-top bag and a rolling pin for a bit of fun! Mix in the melted butter so every crumb is coated, then press the mixture firmly into the base of your pan. You want it packed in nice and tight—use the bottom of a measuring cup or your fingers. Slide the pan into the freezer for at least 15-20 minutes so the crust sets up and gets beautifully firm.
Step 2: Whip Up Rich Chocolate Fudge Sauce
While the crust chills, let’s make that dream-worthy fudge sauce! Melt the butter in a saucepan over medium-low, whisk in the cocoa powder until it’s lusciously smooth and the kitchen smells like chocolate heaven. Stir in the sugar and heavy cream, then bring to a gentle simmer—keep whisking! After about a minute (don’t boil it, just let it get glossy), take it off the heat and add vanilla plus a pinch of salt. Let this cool completely so your ice cream layers stay firm and fabulous.
Step 3: Layer on the Ice Cream and Nuts
Pull your vanilla ice cream from the freezer about 10-15 minutes beforehand so it’s soft but not melty. Spread half of it gently over the frozen cookie crust—you want even coverage without disturbing the base. Grab your homemade fudge (now thickened) and drizzle half all over the ice cream, then scatter half the peanuts on top (hello, crunchy-salty-sweet perfection!). Repeat the layering: spread on the rest of the ice cream, making it smooth, and get ready for the final freeze.
Step 4: Freeze Until Completely Firm
Cover the whole pan tightly with plastic wrap and aluminum foil—double-sealing keeps freezer burn at bay—and let the magic happen in your freezer for at least 4-6 hours, though overnight is best. This ensures every layer is sliceable and the flavors meld into the ultimate frozen treat. Trust me, the waiting is the hardest part!
Step 5: Top, Decorate, and Serve
Right before you’re ready to wow your friends or family, pull out the cake. Warm the remaining fudge sauce if it’s very thick, then drizzle it generously over the cake, letting it artfully drip down the sides. Sprinkle on the rest of your chopped peanuts (or mixed nuts), pressing them gently into the fudge if you want extra texture. For a bakery look, pipe or dollop whipped cream around the topping. To slice neatly, let the ice cream cake stand at room temp 5-10 minutes and run a sharp knife under hot water between cuts.
How to Serve Homemade Buster Bar Ice Cream Cake

Garnishes
This cake shines all on its own, but you can make each serving extra special! After that fudgy drizzle and peanut sprinkle, try adding a swirl of whipped cream, a cherry on top, or even a few chocolate curls for a super-festive touch. If you’re feeling playful, use rainbow sprinkles for parties. Every extra detail turns this Homemade Buster Bar Ice Cream Cake into a dessert everyone will remember.
Side Dishes
Pairing is simple: serve with a tall glass of cold milk, hot coffee, or even a creamy milkshake for an all-out ice cream party. For a slightly lighter vibe, add a bowl of tart berries—raspberries and strawberries cut the sweetness perfectly. If it’s a birthday bash, this cake is right at home next to bowls of salty popcorn, classic chips, or a fruit platter.
Creative Ways to Present
You can tweak the presentation to wow your guests! Cut the cake into generous squares or use a round biscuit cutter for individual “Buster Bars”. If you’re hosting a retro or DQ-themed party, serve slices in sundae glasses with a spoon. For a summer barbecue, slice into “ice cream cake sticks,” dip one end in extra fudge sauce, and let everyone grab and go—it’s a fantastic finger food version of the Homemade Buster Bar Ice Cream Cake!
Make Ahead and Storage
Storing Leftovers
Pop any leftover cake back in the freezer as soon as you’re done serving. Cover it tightly with plastic wrap and a layer of aluminum foil (or a well-fitting lid) to keep everything fresh and to prevent ice crystals from forming. It’ll hold up beautifully in the freezer for up to two or three weeks—if it lasts that long!
Freezing
Since Homemade Buster Bar Ice Cream Cake is a frozen dessert by nature, it only gets better with a long chill. Assemble the cake completely the day before your event (even up to two days ahead), storing it securely in the pan until ready to decorate and serve. For longer-term storage, make sure it’s double-wrapped to avoid “freezer smell” sneaking in.
Reheating
No reheating is necessary for this cake! If it’s too hard to slice, let it sit at room temperature for 10 minutes to soften slightly. Use a knife warmed under hot water for smooth, effortless cuts. Never microwave—your beautiful layers will melt into a puddle in seconds. Just a little patience and it’ll be perfect every time.
FAQs
Can I make Homemade Buster Bar Ice Cream Cake with different ice cream flavors?
Absolutely—I love experimenting with flavors! Classic vanilla is true to the original, but coffee, chocolate, or even cookie dough ice cream would be delicious. You can also try layering with half vanilla and half chocolate for a “twist” effect.
How do I make this gluten-free?
Easy swap! Use certified gluten-free chocolate sandwich cookies or graham crackers for the crust, and double-check that your ice cream, fudge, and add-ins are gluten-free. You won’t believe how little the taste changes!
Can I use store-bought fudge sauce instead of homemade?
If you’re short on time, you can definitely use your favorite thick hot fudge sauce from the store. Just be sure it’s nice and thick, not runny, so you get those luscious ribbons between ice cream layers.
Is it possible to make this nut-free?
Yes, you can skip peanuts or swap in your favorite nut-free crunchy topping like crushed pretzels, toffee bits, or seeds. It will still be a show-stopping Homemade Buster Bar Ice Cream Cake with plenty of crunch and flavor.
How can I transport this cake to a party?
Keep the cake in its pan, cover tightly, and transport in a cooler packed with ice packs to keep it ultra-cold. Slice after you arrive (and do the final drizzle and toppings then, if possible) for the cleanest presentation and the most wow-factor.
Final Thoughts
I can’t say enough good things about this Homemade Buster Bar Ice Cream Cake—it’s pure joy from the very first crunchy-creamy-chocolatey bite. Whether you’re making it for the nostalgia, the “wow!” at the table, or just because you love ice cream, I promise this will become one of your favorite freezer desserts. Don’t hesitate—gather your ingredients and treat yourself and your loved ones to the ultimate ice cream cake adventure!
PrintHomemade Buster Bar Ice Cream Cake** Recipe

Indulge in the ultimate homemade ice cream cake inspired by the classic Buster Bar, featuring layers of vanilla ice cream, rich chocolate fudge, crunchy peanuts, and a decadent ganache drizzle.
- Prep Time: 45 minutes
- Total Time: At least 8 hours
- Yield: 10–12 servings 1x
- Category: Dessert
- Method: Freezing
- Cuisine: American
- Diet: Vegetarian
Ingredients
Cookie Crust:
- 2 cups (approx. 24–28 cookies) chocolate sandwich cookies (like Oreos), crushed OR graham cracker crumbs
- 1/2 cup (113g) unsalted butter, melted
Chocolate Fudge Sauce:
- 1/2 cup (113g) unsalted butter
- 1/2 cup (118ml) unsweetened cocoa powder (good quality)
- 1 cup (200g) granulated sugar
- 1/2 cup (120ml) heavy cream
- 1 teaspoon vanilla extract
- Pinch of salt
Ice Cream Layers & Nuts:
- 1.5 – 2 quarts (approx. 1.4 – 1.9 liters) vanilla ice cream, slightly softened
- 1.5 – 2 cups (about 250g) roasted salted peanuts, roughly chopped
- Reserved chocolate fudge sauce (from Part 2)
Final Assembly & Decoration:
- Remaining cooled chocolate fudge sauce (from Part 2)
- Remaining chopped peanuts/almonds
- Optional: Whipped cream or Cool Whip, for piping
Instructions
- Cookie Crust: Lightly grease a 9×13 inch baking dish. Pulse cookies in a food processor or crush in a bag. Mix crumbs with melted butter, press into pan, and freeze.
- Chocolate Fudge Sauce: Melt butter, add cocoa, sugar, and cream. Simmer, then add vanilla and salt. Cool to room temperature.
- Ice Cream Layers & Nuts: Soften ice cream, layer half over crust. Drizzle fudge, sprinkle nuts. Add remaining ice cream layer. Freeze until firm.
- Final Assembly & Decoration: Drizzle remaining fudge over cake, sprinkle nuts. Optionally, pipe whipped cream. Serve after slight thawing. Store leftovers in the freezer.
Notes
- You can customize this cake with different ice cream flavors or toppings like caramel or crushed cookies.
- For a quicker version, you can use store-bought hot fudge sauce instead of making it from scratch.
- Ensure your ice cream is just softened for easier layering, not melted.
Nutrition
- Serving Size: 1 slice (assuming 1/12th of the cake)
- Calories: Approximately 450 calories
- Sugar: Approximately 30g
- Sodium: Approximately 200mg
- Fat: Approximately 25g
- Saturated Fat: Approximately 12g
- Unsaturated Fat: Approximately 10g
- Trans Fat: 0g
- Carbohydrates: Approximately 50g
- Fiber: Approximately 3g
- Protein: Approximately 6g
- Cholesterol: Approximately 40mg
Keywords: Buster Bar, Ice Cream Cake, Homemade, Dessert, Vanilla Ice Cream, Chocolate Fudge, Peanuts