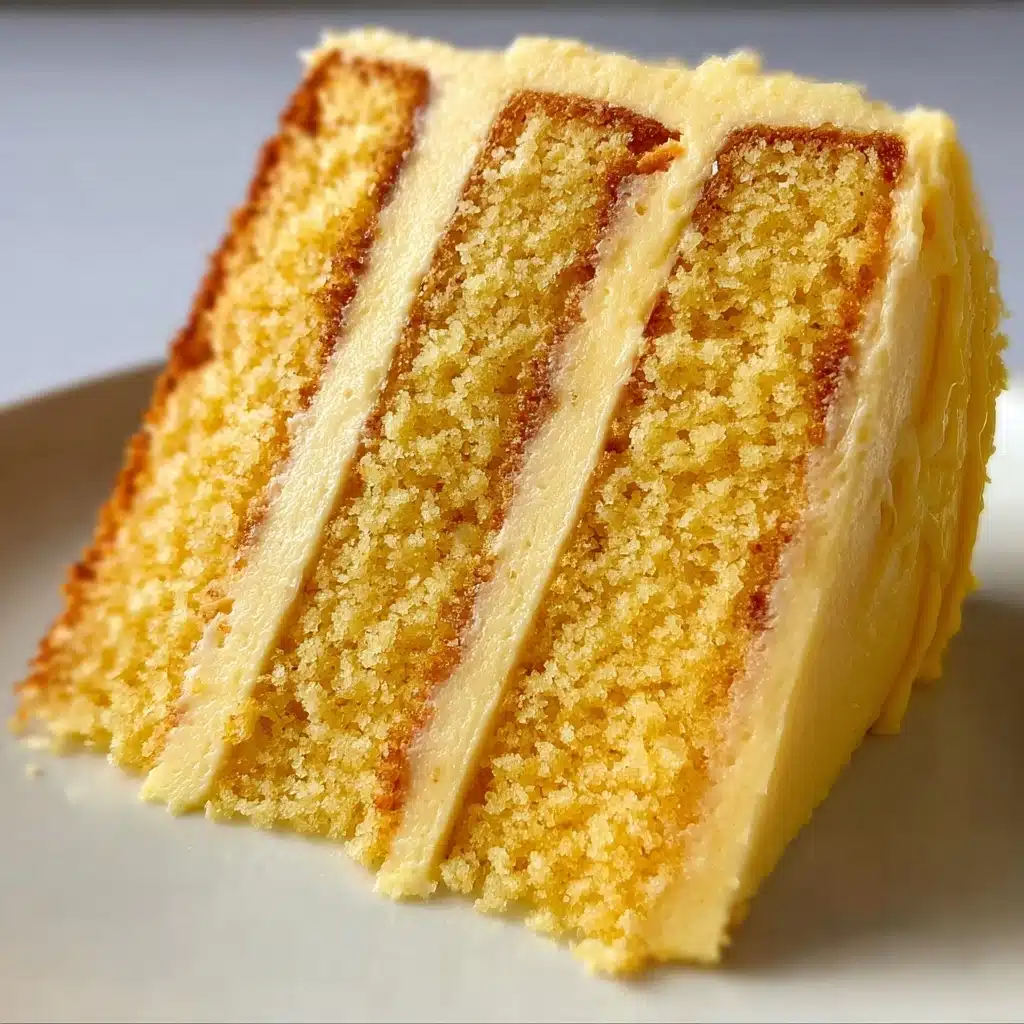
Luscious Layered Vanilla Cake Recipe
There is something truly magical about a well-made Luscious Layered Vanilla Cake that evokes warm memories of celebrations, cozy afternoons, and moments shared with loved ones. This cake is the perfect balance of tender, moist layers, gently scented with real vanilla, and topped with rich, creamy vanilla frosting. When you bite into its delicate crumb, you’ll understand why this Luscious Layered Vanilla Cake has a special place in so many hearts – it’s not just a dessert, it’s an experience of joy and comfort that’s easy to create at home.
Ingredients You’ll Need
The beauty of the Luscious Layered Vanilla Cake lies in its simplicity. Each ingredient is straightforward and plays an essential role in creating the perfect texture, flavor, and color that make this cake so irresistible.
- 300g flour: The foundation of the cake provides structure and a tender crumb.
- 250g sugar: Sweetness that balances perfectly with the vanilla notes.
- 200g butter: Adds richness and moisture, making every bite melt in your mouth.
- 4 eggs: Help bind the ingredients while adding volume and tenderness.
- 150ml milk: Keeps the batter smooth and contributes to a delicate crumb.
- 2 tsp baking powder: The leavening agent that helps the cake rise beautifully.
- 1 tsp vanilla extract: The star flavor that infuses the cake with its iconic, fragrant charm.
- 200g vanilla frosting: The creamy, sweet finish that turns these layers into a luscious masterpiece.
How to Make Luscious Layered Vanilla Cake
Step 1: Prepare Your Baking Pans
Start by preheating your oven to 180°C. Grease two cake pans thoroughly to ensure your layers come out perfectly without sticking. A well-prepared pan helps the cake bake evenly and lift out smoothly when done, setting the stage for those perfect layers.
Step 2: Cream Butter and Sugar
In a mixing bowl, cream the 200g of softened butter with the 250g sugar until the mixture is light and fluffy. This step is crucial as it incorporates air into the batter, giving your cake that wonderfully tender texture you crave in a Luscious Layered Vanilla Cake. Then, add eggs one at a time, beating well after each to incorporate them fully and keep the batter smooth.
Step 3: Combine Dry Ingredients and Incorporate Milk & Vanilla
In a separate bowl, mix the 300g flour with 2 teaspoons of baking powder to combine the dry ingredients. Now add these dry ingredients alternately with the 150ml milk to the butter mixture, starting and ending with the flour. Finally, blend in 1 teaspoon of vanilla extract, which is the secret that elevates this cake from simple to sublime.
Step 4: Bake the Cake Layers
Divide the cake batter evenly between your two prepared pans. Place them in the oven and bake for 25 to 30 minutes, or until a toothpick inserted into the center comes out clean. Baking time can vary slightly depending on your oven, so keep an eye on the color and texture of your layers as they rise to golden perfection.
Step 5: Cool and Assemble
Once baked, allow your cake layers to cool completely on a wire rack. This is key before frosting to prevent melting or sliding. After cooling, generously spread the 200g of vanilla frosting between the layers and on top. Layering the cake with smooth frosting not only adds flavor but also helps to lock in moisture for that luscious, soft bite everyone loves about Luscious Layered Vanilla Cake.
How to Serve Luscious Layered Vanilla Cake

Garnishes
A simple sprinkle of finely chopped nuts or edible flower petals adds a subtle crunch and a dash of elegance. Fresh berries or a light dusting of powdered sugar can also bring a pop of color and brightness to your presentation, enhancing the cake’s inviting vanilla tones.
Side Dishes
This cake pairs wonderfully with a dollop of freshly whipped cream or a scoop of vanilla bean ice cream, making each slice a decadent treat. A cup of freshly brewed coffee or a fragrant herbal tea also complements the cake, balancing its sweetness with warm, comforting flavors.
Creative Ways to Present
Try slicing the cake into elegant squares and stacking them vertically for a modern twist, or serve individual slices topped with a drizzle of homemade caramel sauce. For a party, consider turning the Luscious Layered Vanilla Cake into mini cupcake versions with the same luscious frosting for tasty, grab-and-go delights.
Make Ahead and Storage
Storing Leftovers
You can store leftover cake in an airtight container at room temperature for up to two days, or in the refrigerator for up to five days. Keeping it well wrapped preserves the moistness and ensures every bite remains as heavenly as when it was freshly baked.
Freezing
The Luscious Layered Vanilla Cake freezes well! Wrap leftover slices tightly in plastic wrap and place in a freezer bag. They will keep beautifully for up to three months. When ready to enjoy, thaw the slices overnight in the fridge to preserve texture and flavor.
Reheating
For an extra cozy treat, allow your cake slice to come to room temperature and then warm it gently in the microwave for 15 to 20 seconds. This brings back the soft, fresh-baked feel, making it even more irresistible.
FAQs
Can I substitute butter with oil in this cake?
Butter adds both flavor and richness that oil can’t quite replicate. While you can use oil, the texture and taste will be less buttery and might turn out denser, which may not give you that classic Luscious Layered Vanilla Cake experience.
How can I make sure my cake layers are evenly baked?
Using two pans of the same size and distributing the batter evenly helps ensure they bake uniformly. Also, avoid opening the oven door too often during baking to keep consistent heat.
Is it necessary to use vanilla extract, or can I use vanilla bean instead?
Both options are fantastic. Vanilla bean will give a more intense, aromatic vanilla flavor with little flecks throughout the cake, enhancing your Luscious Layered Vanilla Cake beautifully.
Can I make this cake gluten-free?
Yes! Substitute the all-purpose flour with a gluten-free flour blend that includes xanthan gum for structure. Be mindful that baking times may vary slightly.
What is the best way to get smooth frosting on the cake?
Use an offset spatula or the back of a spoon to spread the frosting in thin, even layers. Chilling the cake for 15 minutes between frosting layers can make smoothing easier and help avoid crumbs mixing into your icing.
Final Thoughts
Making a Luscious Layered Vanilla Cake at home is such a rewarding experience, filled with the warmth of baking and the joy of sharing a decadent treat. Whether for a special occasion or just a sweet indulgence, this cake’s tender crumb and creamy frosting will never disappoint. I can’t wait for you to try it and make it one of your favorite homemade classics!
PrintLuscious Layered Vanilla Cake Recipe
This Luscious Layered Vanilla Cake is a classic dessert featuring moist, tender layers of vanilla-infused sponge cake, perfectly complemented by smooth, creamy vanilla frosting. Ideal for celebrations or a delightful treat any day, it combines simple ingredients into a stunning showstopper with a rich vanilla aroma and balanced sweetness.
- Prep Time: 20 minutes
- Cook Time: 30 minutes
- Total Time: 50 minutes
- Yield: 8 servings 1x
- Category: Dessert
- Method: Baking
- Cuisine: American
- Diet: Vegetarian
Ingredients
Cake Batter
- 300g all-purpose flour
- 250g granulated sugar
- 200g unsalted butter, softened
- 4 large eggs
- 150ml whole milk
- 2 tsp baking powder
- 1 tsp pure vanilla extract
Frosting
- 200g vanilla frosting (store-bought or homemade)
Instructions
- Preheat and Prepare Pans: Preheat your oven to 180°C (350°F). Grease two 8-inch round cake pans thoroughly and lightly dust with flour to prevent sticking.
- Cream Butter and Sugar: In a large mixing bowl, beat the softened butter and granulated sugar together until the mixture becomes light, fluffy, and pale in color, typically about 3-5 minutes using an electric mixer.
- Add Eggs: Incorporate the eggs one at a time, beating well after each addition to ensure they are fully combined and the batter remains smooth.
- Combine Dry Ingredients: In a separate bowl, sift together the all-purpose flour and baking powder to evenly distribute the leavening agent.
- Mix Batter: Alternately add the flour mixture and milk to the butter mixture in three additions, beginning and ending with the flour. Add the vanilla extract with the milk and mix gently after each addition until fully incorporated without overmixing.
- Divide and Bake: Pour the batter evenly into the prepared pans, smoothing the top with a spatula. Bake in the preheated oven for 25-30 minutes or until a toothpick inserted in the center comes out clean.
- Cool: Allow the cakes to cool in their pans for 10 minutes before transferring them to a wire rack to cool completely to room temperature.
- Assemble and Frost: Once cooled, spread a generous layer of vanilla frosting on top of one cake layer. Place the second cake on top and evenly frost the top and sides as desired.
- Serve: Slice the cake and serve. Enjoy your luscious layered vanilla cake with a cup of tea or coffee!
Notes
- Ensure all ingredients are at room temperature for best mixing and texture.
- Do not overmix the batter to maintain cake tenderness.
- You can substitute milk with almond or oat milk to make it dairy-free.
- Store leftover cake covered at room temperature for up to 2 days or refrigerate for up to 5 days.
- The vanilla frosting can be homemade using butter, powdered sugar, vanilla extract, and a little milk or cream.
Nutrition
- Serving Size: 1 slice (1/8 of cake)
- Calories: 420 kcal
- Sugar: 30g
- Sodium: 200mg
- Fat: 24g
- Saturated Fat: 14g
- Unsaturated Fat: 8g
- Trans Fat: 0g
- Carbohydrates: 45g
- Fiber: 1g
- Protein: 5g
- Cholesterol: 110mg
Keywords: vanilla cake, layered cake, vanilla frosting, homemade cake, dessert, baking