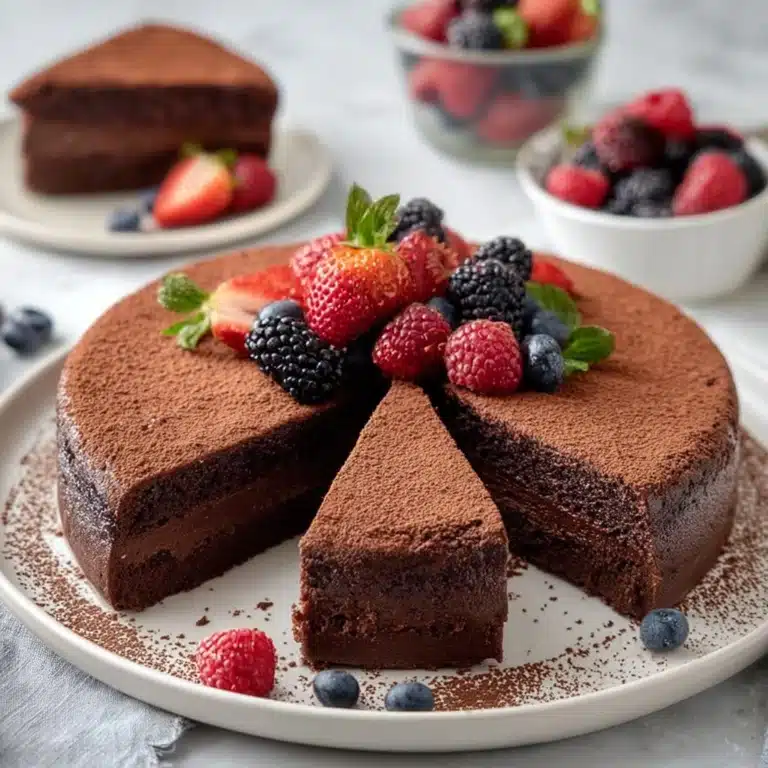
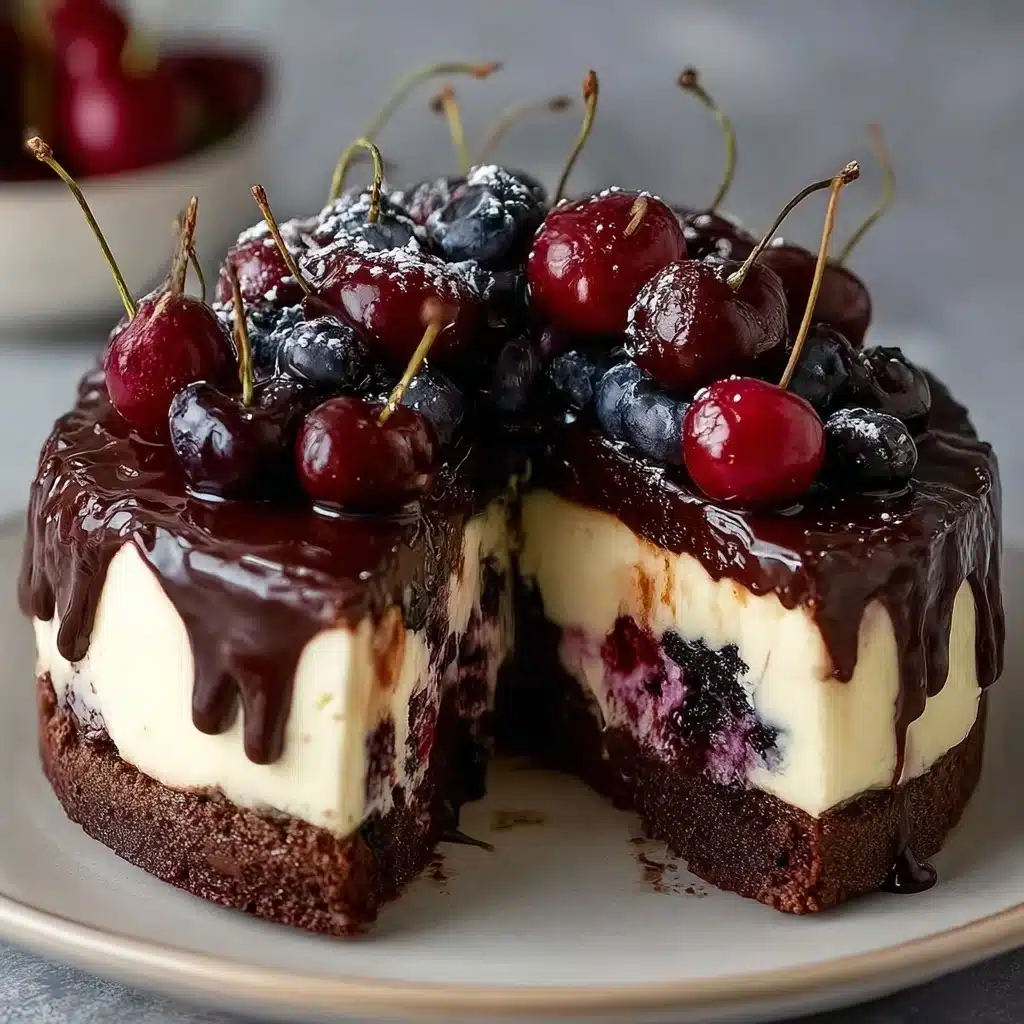
No-Bake Black Forest Cheesecake** Recipe
This No-Bake Black Forest Cheesecake is pure dessert decadence! Imagine a lush, creamy cheesecake filling layered over a crunchy Oreo crust, topped generously with cherry pie filling and finished with a glossy chocolate ganache. Every bite tastes just like the classic German cake, but with the irresistible richness of cheesecake—and you don’t even have to turn on your oven. It’s a showstopping centerpiece for any celebration or potluck, and best of all, it’s simple enough for a cozy night at home when only the most indulgent dessert will do.
Ingredients You’ll Need
The beauty of this No-Bake Black Forest Cheesecake is how each ingredient plays a starring role—nothing complicated, just delicious essentials working together for one unforgettable treat. From the dark crunch of Oreos to the tang of cream cheese and the glossy finish of ganache, here’s what you’ll need and why each matters:
- Oreo cookies: These create a rich, chocolatey base that’s both sturdy and full of nostalgia.
- Unsalted butter: Melted and mixed with Oreos, it binds the crust and adds a lovely depth.
- Cream cheese: The heart of the cheesecake—choose full-fat for creaminess and structure.
- Granulated sugar: Sweetens the filling just enough to let those cherry and chocolate flavors sing.
- Vanilla extract: A little brings warm, aromatic notes to balance the richness.
- Sour cream: Adds tang and a smooth, velvety texture to the filling.
- Heavy cream: Whipped in, it creates the fluffy, cloud-like consistency of the best no-bake cheesecakes.
- Unflavored gelatin powder: Ensures your cheesecake slices beautifully and holds its shape on the plate.
- Cold water: For blooming the gelatin so your filling is set just right.
- Cherry pie filling: The signature, sweet-tart layer that gives this dessert its classic Black Forest character.
- Semi-sweet chocolate chips: Melted into ganache, they provide a glossy, decadent finish.
- Extra heavy cream: For the ganache—makes it silky, shiny, and perfect for pouring.
- Fresh cherries and blueberries: Dress up the top with a pop of juicy color and freshness.
How to Make No-Bake Black Forest Cheesecake
Step 1: Prepare the Oreo Crust
Start by crushing your Oreo cookies—cream filling and all—into fine crumbs. Mixing them with melted butter is the easiest way to create that irresistible, chocolatey base. Press the mixture firmly into the bottom of your springform pan using the back of a spoon or even your fingertips. The key is to pack it down evenly so it becomes a solid foundation for everything delicious that comes next. Chill this in the fridge for at least 30 minutes; this helps it set up and gives it that lovely snap when you slice into your finished No-Bake Black Forest Cheesecake.
Step 2: Whip Up the Cheesecake Filling
Beat together softened cream cheese and sugar until the mixture is completely smooth and fluffy—it’s impossible not to sneak a fingerful at this stage. Blend in the vanilla extract and sour cream for that signature tang. Meanwhile, bloom your unflavored gelatin by sprinkling it over cold water and letting it sit. After it softens, heat it briefly in the microwave until dissolved, then stir it right into the cheesecake mixture. The magic touch: gently folding in freshly whipped cream. This step ensures your cheesecake filling stays feather-light and wonderfully creamy, even after chilling.
Step 3: Assemble and Chill
Pour the airy cheesecake filling onto the chilled Oreo crust and spread it into an even layer. Now comes the best part—the cherry pie filling! Dollop it over the cheesecake and spread it gently so each slice is crowned with juicy, ruby-red cherries. Cover and refrigerate for at least 6 hours, or overnight if you’re patient. This is what allows the No-Bake Black Forest Cheesecake to set perfectly and makes each bite turn out just right.
Step 4: Chocolate Ganache
While your cheesecake is chilling, make the chocolate ganache. Just combine chocolate chips and heavy cream, and microwave in short bursts, stirring until smooth and glossy. Let the ganache cool slightly, so it doesn’t melt the cherry layer. When ready, pour the ganache over the cheesecake, letting a bit drip down the sides for that classic bakery finish. This rich, shiny chocolate layer is pure indulgence.
Step 5: Garnish and Serve
Complete your masterpiece with a tumble of fresh cherries and blueberries on top. Their burst of color is stunning and their juicy freshness plays so well with the creamy and chocolatey layers. Slice, serve, and watch the smiles spread—this is the moment every No-Bake Black Forest Cheesecake maker lives for!
How to Serve No-Bake Black Forest Cheesecake

Garnishes
This cheesecake looks stunning on its own, but a few thoughtful garnishes make it even more festive. Try extra fresh cherries (with stems for an elegant look), a handful of blueberries, or even some chocolate curls if you’re feeling fancy. A light dusting of powdered sugar right before serving adds a touch of magic.
Side Dishes
Because No-Bake Black Forest Cheesecake is so rich, it pairs nicely with simple sides. Serve it with a strong cup of espresso, a glass of cold milk, or even a tart berry compote. If you want a true dessert spread, offer some crisp butter cookies or a bowl of lightly sweetened whipped cream alongside.
Creative Ways to Present
Don’t limit yourself to the classic springform pan! Try making this cheesecake in individual jars for picnics or parties—it’s adorable and portable. Or slice it into slender bars for a fun finger-food version. You can even swirl some of the ganache into the cherry topping before it fully sets for a marbled effect that wows every guest.
Make Ahead and Storage
Storing Leftovers
If you have any leftovers (rare, but possible!), simply cover the cheesecake tightly with plastic wrap or keep it in an airtight container in the refrigerator. It will stay wonderfully fresh for up to 4 days—just note that the toppings may lose a bit of their glossy shine over time, but the flavors only meld and improve.
Freezing
No-Bake Black Forest Cheesecake can be frozen for those times when you want dessert on hand at a moment’s notice. Freeze individual slices on a baking sheet, then wrap each tightly in foil and place in a sealed bag. Thaw overnight in the refrigerator before serving—you may want to add fresh garnishes to revive that ‘just made’ look.
Reheating
This dessert is best served chilled, so there’s no need to reheat. If it’s been in the freezer, let your cheesecake thaw in the fridge, then let it stand at room temperature for 10–15 minutes before serving for the smoothest, creamiest texture.
FAQs
Can I use fresh cherries instead of cherry pie filling?
Absolutely! If cherries are in season, simmer fresh, pitted cherries with a little sugar and lemon juice until syrupy, then cool completely before using. This gives your No-Bake Black Forest Cheesecake a homemade touch and lets you control the sweetness.
Is the gelatin necessary?
Gelatin helps the cheesecake set firm enough for beautiful slices. If you’d prefer a softer texture or want a vegetarian version, you can swap with agar-agar (follow package instructions), but don’t skip a stabilizer unless you’re okay with a softer, cream-pie style cheesecake.
Can I make the crust gluten-free?
Definitely! Use gluten-free chocolate sandwich cookies in place of Oreos for a crust that everyone can enjoy. Just be sure to check labels on your other ingredients to keep the whole No-Bake Black Forest Cheesecake gluten-free.
How far in advance can I make this cheesecake?
This dessert is actually better when made ahead! Assemble it the day before your event and let it set overnight in the fridge. Add ganache and fresh fruit just before serving for the prettiest results.
What kind of pan should I use for easy removal?
A 9-inch springform pan is ideal. Simply run a knife around the edges, release the sides, and lift out your gorgeous No-Bake Black Forest Cheesecake without worrying about sticking or crumbling.
Final Thoughts
If you’re searching for a showstopping yet surprisingly simple recipe, this No-Bake Black Forest Cheesecake truly delivers. Every layer bursts with flavor and texture, and since there’s no oven required, it’s as stress-free as it is spectacular. Gather your ingredients and get ready to enjoy a dessert that feels both classic and new—you’ll be amazed by how quickly this cheesecake becomes a favorite in your kitchen!
PrintNo-Bake Black Forest Cheesecake** Recipe
Indulge in the rich and luscious flavors of this No-Bake Black Forest Cheesecake that combines the classic elements of a Black Forest cake with a creamy cheesecake filling. A stunning dessert that’s perfect for any special occasion or gathering.
- Prep Time: 30 minutes
- Cook Time: 0 minutes
- Total Time: 6 hours 30 minutes
- Yield: 1 9-inch cheesecake 1x
- Category: Dessert
- Method: No-Bake
- Cuisine: American
- Diet: Vegetarian
Ingredients
For the Oreo crust:
- 25 Oreo cookies, crushed
- 1/2 cup (115g) unsalted butter, melted
For the cheesecake filling:
- 3 (8-ounce) packages full-fat cream cheese, softened
- 1 cup (200g) granulated sugar
- 1 tsp vanilla extract
- 1/2 cup (120g) sour cream
- 1/2 cup heavy cream, cold
- 1 tsp unflavored gelatin powder
- 2 tbsp cold water
For the cherry and ganache topping:
- 1 (21-ounce) can cherry pie filling
- 1 cup (170g) semi-sweet chocolate chips
- 1/2 cup (120ml) heavy cream
- Fresh cherries and blueberries for garnish
Instructions
- Prepare the crust: In a medium bowl, mix the crushed Oreo cookies and melted butter until well combined. Press the mixture firmly into the bottom of a 9-inch springform pan. Refrigerate for at least 30 minutes to set.
- Make the cheesecake filling: In a large bowl, use a stand mixer or hand mixer to beat the cream cheese and sugar until smooth. Beat in the vanilla and sour cream until combined. In a small bowl, sprinkle the gelatin over the cold water and let it sit for 5 minutes to bloom. Microwave the gelatin mixture for 10-15 seconds until it is completely dissolved. Stir the dissolved gelatin into the cheesecake mixture. In a separate chilled bowl, whip the heavy cream until stiff peaks form. Gently fold the whipped cream into the cheesecake filling until just combined.
- Assemble the cheesecake: Pour the cheesecake filling over the chilled Oreo crust. Gently spread the cherry pie filling over the top of the cheesecake. Refrigerate for at least 6 hours, or preferably overnight, to allow it to set completely.
- Make the ganache: In a microwave-safe bowl, combine the chocolate chips and heavy cream. Microwave in 30-second intervals, stirring in between, until the chocolate is completely melted and the mixture is smooth and glossy.
- Garnish and serve: Remove the cheesecake from the pan. Pour the ganache over the top of the chilled cheesecake, allowing it to drip down the sides. Top with fresh cherries and blueberries. Slice and serve.
Nutrition
- Serving Size: 1 slice
- Calories: 450
- Sugar: 25g
- Sodium: 320mg
- Fat: 30g
- Saturated Fat: 17g
- Unsaturated Fat: 10g
- Trans Fat: 0g
- Carbohydrates: 40g
- Fiber: 2g
- Protein: 6g
- Cholesterol: 80mg
Keywords: No-Bake Black Forest Cheesecake, Black Forest Cheesecake recipe, easy cheesecake recipe, no-bake dessert, cherry cheesecake