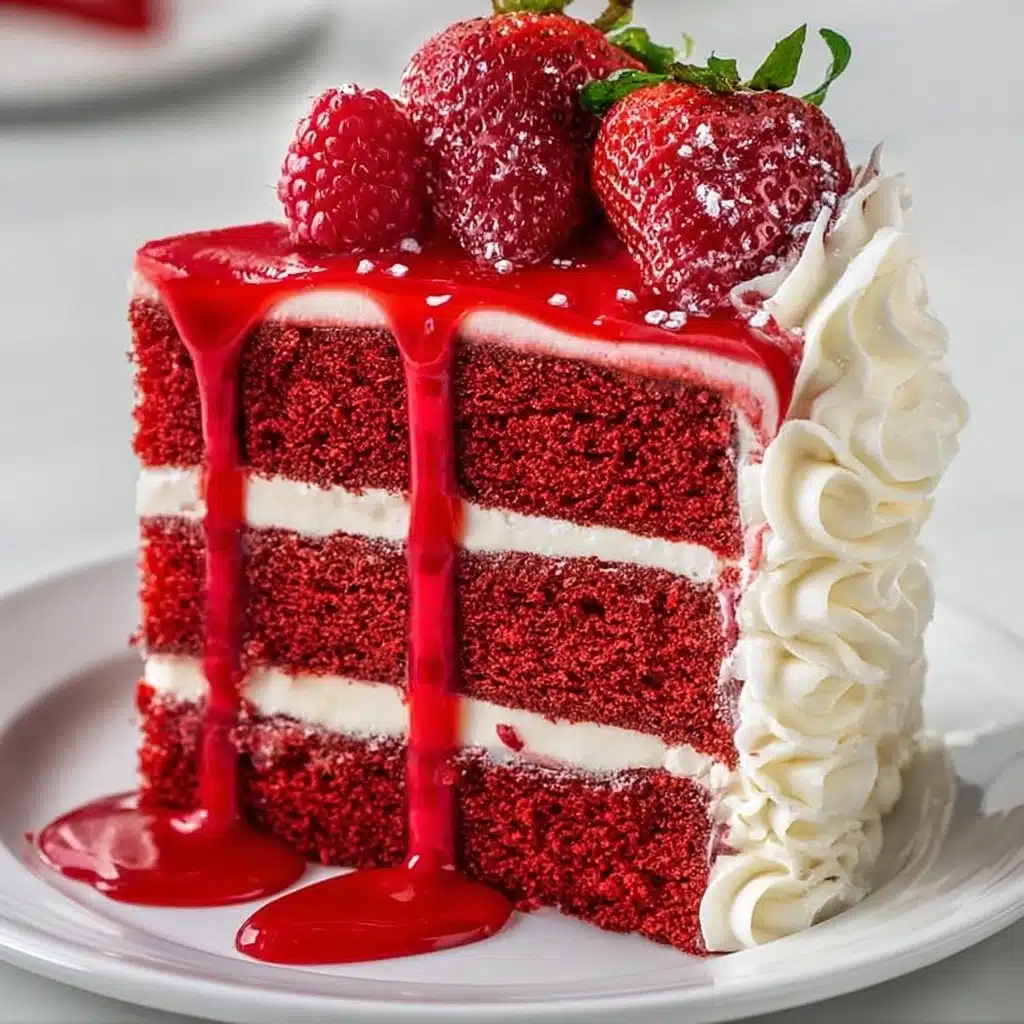
Red Velvet Cheesecake Recipe
If you have a sweet tooth and love desserts that steal the show, you are going to adore this Red Velvet Cheesecake. This luscious, layered delight combines the classic, velvety red velvet cake with a rich and creamy cheesecake center, all wrapped in fluffy cream cheese frosting. The striking red color paired with the smooth cheesecake creates a beautiful presentation and a flavor harmony that’s truly unforgettable. Whether you’re celebrating a special occasion or simply craving something indulgent, this Red Velvet Cheesecake delivers decadence in every bite, making it an instant favorite.

Ingredients You’ll Need
Making this Red Velvet Cheesecake is easier than you might think, with simple, pantry-friendly ingredients that each play a vital role. From the tender crumb of the red velvet cake layers to the silky cheesecake filling and creamy frosting, every component shines through using these carefully chosen essentials.
- All-purpose flour: The backbone of the cake, creating structure and softness.
- Unsweetened cocoa powder: Adds a subtle chocolate depth to complement the red velvet flavor.
- Baking soda: Helps the cake rise perfectly for that light texture.
- Granulated sugar: Sweetens both the cake and cheesecake layers beautifully.
- Vegetable oil: Keeps the red velvet cake moist and tender.
- Buttermilk (or milk + vinegar): Adds tang and moisture, enhancing the cake’s flavor.
- Eggs: Bind the batter and add richness to all layers.
- Vanilla extract: Brings warmth and complexity to every part of the cake.
- White vinegar: Intensifies the red color and reacts with baking soda for fluffiness.
- Red food coloring: That iconic vibrant red hue that makes this dessert irresistible.
- Cream cheese: The star of the cheesecake layer and frosting, delivering that velvety texture.
- Sour cream: Adds creaminess and a slight tang to the cheesecake filling.
- Unsalted butter: Used in the frosting to provide softness and richness.
- Powdered sugar: Sweetens and smooths the frosting for perfect spreadability.
How to Make Red Velvet Cheesecake
Step 1: Prepare the Cheesecake Layer
Start by preheating your oven to 325°F (160°C), and get a 9-inch springform pan ready with parchment paper and a light grease on the sides. Beat the cream cheese and sugar until they’re beautifully smooth and creamy—this ensures a silky cheesecake with no lumps. Add the eggs one at a time, mixing gently to keep the batter from over-beating. Incorporate sour cream and vanilla until it’s all luxuriously blended. Pour the batter into your pan and bake for 40 to 45 minutes until the center is just set. Let it cool in the oven turned off, then chill it in the fridge for at least 4 hours, or overnight for best results. Patience here rewards you with a perfect texture!
Step 2: Bake the Red Velvet Cake Layers
With the oven now at 350°F (175°C), grease and line two 9-inch round cake pans. Mix together the dry ingredients: flour, unsweetened cocoa powder, baking soda, and salt. In another large bowl, beat together the sugar, vegetable oil, buttermilk, eggs, vanilla, white vinegar, and that all-important red food coloring until smooth and vibrant. Combine the dry mix with the wet ingredients gradually, stirring until everything melds into a velvety batter. Pour the batter evenly into your pans and bake for 25 to 30 minutes, or until a toothpick emerges clean. Cool completely before assembling.
Step 3: Assemble Your Red Velvet Cheesecake
Place one cooled red velvet cake layer on your serving plate, then spread a thin layer of cream cheese frosting to “glue” the layers together. Gently position your chilled cheesecake layer on top, followed by the second red velvet cake layer. Now comes the fun part: coat the entire cake in that luscious cream cheese frosting. Smooth it lovingly over the sides and top, turning your cake into a masterpiece that’s as beautiful as it is delicious.
Step 4: Make the Cream Cheese Frosting
Beat together softened cream cheese and unsalted butter until fluffy and light. Add vanilla extract for another hint of sweetness before slowly mixing in sifted powdered sugar. The result is a smooth, creamy frosting that spreads like a dream and perfectly balances the tangy richness of the cheesecake and the subtle cocoa notes of the red velvet cake.
Step 5: Decorate and Chill
For the finishing touches, sprinkle red velvet cake crumbs over the cake or around its sides to add texture and a pop of color. White chocolate curls or shavings add an elegant contrast and extra indulgence. Chill the Red Velvet Cheesecake for at least one hour before slicing. This helps the layers set beautifully, making each slice clean and impressive when served.
How to Serve Red Velvet Cheesecake
Garnishes
Garnishing your Red Velvet Cheesecake not only amps up its beauty but also adds delightful textures. Red velvet crumbs create a rustic charm, while white chocolate curls lend a touch of sophistication. Fresh berries or a light dusting of cocoa powder can also complement the flavors wonderfully.
Side Dishes
Though the cake is rich and satisfying on its own, light accompaniments like fresh whipped cream, a scoop of vanilla bean ice cream, or a drizzle of raspberry sauce can elevate the experience. These sides balance the richness, adding freshness and brightness to every forkful.
Creative Ways to Present
For gatherings, consider serving this Red Velvet Cheesecake in mini springform pans for individual portions or as layered parfaits in clear glasses showing off the stunning red, white, and creamy layers. You can also slice it into elegant squares and plate each with a garnish for a sophisticated dessert course.
Make Ahead and Storage
Storing Leftovers
Store leftover Red Velvet Cheesecake in an airtight container in the refrigerator for up to five days. Be sure to keep the frosting side up and avoid stacking slices to preserve the texture and prevent any smudging of that beautiful frosting.
Freezing
This cheesecake freezes well! Wrap it tightly in plastic wrap and aluminum foil to protect it from freezer burn, and it will keep for up to three months. Thaw it overnight in the refrigerator before serving to maintain creamy texture.
Reheating
Since this is a chilled dessert, reheating is generally not recommended. However, if you want to soften the slices slightly, leaving them at room temperature for 15 to 20 minutes before serving works wonders without compromising the flavor or texture.
FAQs
Can I make this Red Velvet Cheesecake without food coloring?
The vivid red color is traditional, but you can omit the food coloring if you prefer. Just keep in mind the cake will look more like a light chocolate or pinkish cake rather than classic red velvet. Natural alternatives like beet juice can also be experimented with.
What’s the best pan to use for the cheesecake layer?
A 9-inch springform pan is ideal because it makes removing the delicate cheesecake layer easier without damage. Lining the bottom with parchment paper also helps with a smooth release.
Can I use regular milk instead of buttermilk?
Yes! To mimic buttermilk’s acidity, add 1 teaspoon of vinegar or lemon juice to ½ cup of milk and let it sit for 5 minutes before using. This helps activate the baking soda and tenderizes the cake.
How do I prevent cracks in the cheesecake layer?
Baking the cheesecake at a lower temperature and allowing it to cool gradually in the turned-off oven helps prevent cracks. Avoid overmixing and ensure your cream cheese is room temperature before starting.
Is this cake suitable for parties and special occasions?
Absolutely! The Red Velvet Cheesecake’s stunning layered appearance and crowd-pleasing flavors make it a fantastic choice for birthdays, holidays, or any celebration that calls for a show-stopping dessert.
Final Thoughts
This Red Velvet Cheesecake is a delightful celebration of flavors and textures that’s as gorgeous as it is scrumptious. Once you try this recipe, you’ll understand why it’s a beloved dessert for special moments and everyday treats alike. Don’t hesitate to whip one up and share the joy—it’s sure to become a cherished favorite in your dessert repertoire!
PrintRed Velvet Cheesecake Recipe
This decadent Red Velvet Cheesecake combines the rich, moist texture of classic red velvet cake with a creamy, smooth cheesecake center, topped with luscious cream cheese frosting. Perfectly layered and elegantly garnished, this dessert is a showstopper for any special occasion or festive gathering.
- Prep Time: 40 minutes
- Cook Time: 1 hour 15 minutes
- Total Time: 6 hours (including chilling)
- Yield: 10 servings 1x
- Category: Dessert
- Method: Baking
- Cuisine: American
- Diet: Vegetarian
Ingredients
Red Velvet Cake Layers
- 1 ¼ cups all-purpose flour
- 1 tablespoon unsweetened cocoa powder
- ½ teaspoon baking soda
- ¼ teaspoon salt
- ¾ cup granulated sugar
- ½ cup vegetable oil
- ½ cup buttermilk (or milk + 1 tsp vinegar)
- 1 large egg
- 1 teaspoon vanilla extract
- 1 teaspoon white vinegar
- 1 tablespoon red food coloring
Cheesecake Layer
- 16 oz (450 g) cream cheese, softened
- ¾ cup granulated sugar
- 2 large eggs
- ½ cup sour cream
- 1 teaspoon vanilla extract
Cream Cheese Frosting
- 8 oz (225 g) cream cheese, softened
- ¼ cup unsalted butter, softened
- 1 teaspoon vanilla extract
- 2 cups powdered sugar, sifted
Optional Garnish
- Red velvet cake crumbs
- White chocolate curls or shavings
Instructions
- Prepare the Cheesecake Layer: Preheat your oven to 325°F (160°C). Line the bottom of a 9-inch springform pan with parchment paper and lightly grease the sides. In a large bowl, beat the softened cream cheese together with sugar until the mixture is smooth and creamy. Add the eggs one at a time, mixing on low speed until just combined. Stir in the sour cream and vanilla extract until the batter is smooth. Pour this cheesecake batter into the prepared pan and bake for 40 to 45 minutes, or until the center is set but still slightly jiggly. Once baked, turn off the oven, allow the cheesecake to cool completely inside, then refrigerate for at least 4 hours or overnight to set fully.
- Make the Red Velvet Cake Layers: Preheat your oven to 350°F (175°C). Grease and line two 9-inch round cake pans with parchment paper. In a bowl, whisk together the all-purpose flour, cocoa powder, baking soda, and salt. In a separate large bowl, beat the granulated sugar, vegetable oil, buttermilk, egg, vanilla extract, white vinegar, and red food coloring until everything is well combined and smooth. Gradually add the dry ingredients to this wet mixture, stirring gently until just smooth without overmixing. Divide the batter evenly between the two prepared pans. Bake for 25 to 30 minutes, or until a toothpick inserted into the center comes out clean. Allow cakes to cool completely on a wire rack.
- Assemble the Cheesecake: Place one red velvet cake layer on your serving plate. Spread a thin layer of the cream cheese frosting over this layer to act as a glue, helping to hold the cheesecake in place. Carefully place the chilled cheesecake layer on top of the first cake layer, then place the second red velvet cake layer on top of the cheesecake, creating a beautiful layered effect.
- Make the Frosting: In a bowl, beat the softened cream cheese and unsalted butter together until fluffy and smooth. Add the vanilla extract and mix well. Gradually add the sifted powdered sugar, beating continuously until the frosting is smooth, creamy, and spreadable.
- Decorate and Serve: Use the cream cheese frosting to cover the entire assembled cake, smoothing the top and sides evenly. Garnish with red velvet cake crumbs around the edges or on top, and add white chocolate curls or shavings for an elegant finish. Chill the completed cake in the refrigerator for at least 1 hour before slicing to achieve the best texture and stability. Serve chilled and enjoy!
Notes
- Use softened cream cheese and butter for the smoothest frosting texture.
- If buttermilk is unavailable, substitute regular milk with 1 teaspoon of vinegar or lemon juice added per ½ cup.
- Ensure the cheesecake layer is fully chilled and firm before assembling for easier handling and cleaner slices.
- To avoid cracks on the cheesecake surface, do not overbake and let it cool gradually.
- The chilling time is essential for the cake to set properly and to develop full flavors.
- Use gel-based red food coloring for a more vibrant red color that won’t thin the batter.
Nutrition
- Serving Size: 1 slice (1/10th of cake)
- Calories: 430
- Sugar: 35g
- Sodium: 320mg
- Fat: 28g
- Saturated Fat: 14g
- Unsaturated Fat: 12g
- Trans Fat: 0.5g
- Carbohydrates: 38g
- Fiber: 1g
- Protein: 6g
- Cholesterol: 95mg
Keywords: Red Velvet Cheesecake, Layered Cheesecake, Cream Cheese Frosting, Classic Dessert, Holiday Cake, Party Cake, Moist Red Velvet Cake