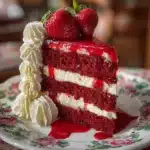
Red Velvet Strawberry Cheesecake Recipe
If you’re looking to wow your guests (or simply treat yourself!) with a dessert that’s as stunning as it is delicious, let me introduce you to Red Velvet Strawberry Cheesecake. This beauty is the ultimate showstopper, combining rich cocoa-kissed cake, velvety smooth cheesecake, and a vibrant, sweet-tart strawberry topping that makes every bite a celebration. Whether for birthdays, anniversaries, or just a slice-of-heaven kind of day, this decadent dessert delivers on flavor, texture, and drama with every forkful.

Ingredients You’ll Need
The magic of this Red Velvet Strawberry Cheesecake comes from a handful of straightforward but carefully chosen ingredients. Each one plays a crucial role, giving you that signature red velvet layer, creamy cheesecake, and a fresh strawberry finish. Here’s what you’ll need—and why you shouldn’t skip a single one:
- All-purpose flour: Base for the red velvet cake, providing structure without dryness.
- Unsweetened cocoa powder: Just a touch gives that classic subtle chocolate flavor which makes red velvet irresistible.
- Baking soda: Makes the cake rise perfectly and keeps it tender.
- Salt: Balances sweetness and brings out the other flavors.
- Unsalted butter: Adds richness and creates a soft crumb in the cake layer.
- Granulated sugar: Sweetens both the cake and cheesecake layers for uniform flavor.
- Eggs: Binds everything together and adds creaminess and lift.
- Vegetable oil: Keeps the red velvet layer moist and lush.
- Vanilla extract: A little aromatic warmth that ties all the layers together.
- White vinegar: Reacts with the baking soda for that classic red velvet texture and tang.
- Red food coloring: Gives the cake its eye-catching, vivid color.
- Buttermilk: Essential for tenderness and that signature slight tang in red velvet.
- Cream cheese: The heart of the cheesecake layer, perfectly creamy and rich.
- Sour cream: Adds a delicate tang and silkiness to the cheesecake.
- Fresh strawberries: Sweet, juicy, and gorgeously colorful for the topping.
- Lemon juice: Brightens up the strawberry flavor on top.
- Cornstarch (optional): Thickens the strawberry topping for those who like it extra luscious.
- Whipped cream (optional): For an extra light finish and a bit of fancy flair.
How to Make Red Velvet Strawberry Cheesecake
Step 1: Prepare the Red Velvet Cake Layer
Let’s begin with the base. Preheat your oven to 350°F (175°C), and get a 9-inch springform pan ready (grease and line it for easy unmolding later). Sift flour, cocoa, baking soda, and salt together so your cake layer stays tender and evenly mixed. In a large bowl, whisk butter and sugar until fluffy, then beat in the eggs one at a time. Next, stir in the vegetable oil, vanilla extract, white vinegar, and that lovely red food coloring. Alternate adding your dry ingredients and buttermilk; this keeps the batter super smooth. Spread the batter in your pan and bake just until set—about 20 to 25 minutes. Let the cake cool slightly so the cheesecake layer doesn’t melt into it.
Step 2: Make the Cheesecake Layer
Time to turn this into a true Red Velvet Strawberry Cheesecake! Lower your oven to 325°F (160°C). Beat softened cream cheese and sugar until creamy and dreamy—no lumps allowed! Add eggs one at a time, then blend in vanilla and sour cream until just combined (over-mixing can cause cracks, so keep it gentle). Pour the batter over your cooled cake layer and smooth the top. Bake for 45–50 minutes, just until the center is nearly set. After baking, prop open the oven door and let your cheesecake cool inside for an hour; this prevents sudden temperature changes that can crack the top. Once it’s finished, chill in the fridge at least 4 hours (overnight is best for the ultimate texture).
Step 3: Prepare the Strawberry Topping
While your cheesecake is chilling, let’s get those strawberries ready! Combine sliced strawberries, granulated sugar, and lemon juice in a saucepan. Gently simmer over medium heat so the berries release their bright juices and turn glossy—this usually takes about 5–7 minutes. If you want a thicker sauce, dissolve some cornstarch in water and stir it in; simmer for an extra minute or two. Let the topping cool completely before layering it onto your cheesecake so the creamy layer stays pristine.
Step 4: Assemble the Cheesecake
The big reveal! Remove your chilled Red Velvet Strawberry Cheesecake from the pan and slide it onto a serving plate. Spoon that ruby-red strawberry topping all over the top, letting a few berries tumble down the sides for irresistible appeal. Every layer shines—vivid red cake, creamy white cheesecake, glistening strawberry sauce.
Step 5: Decorate & Serve
To garnish, crown your masterpiece with whole fresh strawberries and (if you’re feeling extra bold) pretty swirls of whipped cream. Slice with a hot, dry knife to reveal the jaw-dropping layers inside. Prepare for cheers and second helpings—this dessert is guaranteed to turn any occasion into a memory!
How to Serve Red Velvet Strawberry Cheesecake

Garnishes
Simple toppings can make your Red Velvet Strawberry Cheesecake look like it came straight from a French patisserie. Dot the top with whole strawberries, pipe a ring of whipped cream around the edge, or scatter white chocolate curls for some extra glam. Each option complements the vibrant colors and the flavor profile beautifully.
Side Dishes
Although this cheesecake is a superstar on its own, you can pair it with a few light sides for a totally decadent spread. Try serving it with a bubbly glass of Champagne, a cup of freshly brewed espresso, or a small bowl of vanilla bean ice cream. The contrast of temperatures and textures is absolutely delightful.
Creative Ways to Present
Why not get a little playful? Try slicing your Red Velvet Strawberry Cheesecake into mini cubes and serving them on skewers with extra strawberry halves, or plate individual slices with drizzles of chocolate sauce and a dusting of powdered sugar. For parties, you can even cut the cheesecake into petite rounds using a biscuit cutter—adorable and perfect for a dessert buffet!
Make Ahead and Storage
Storing Leftovers
If you’re lucky enough to have leftovers, simply cover the cheesecake with plastic wrap or store slices in airtight containers. Keep the cheesecake refrigerated, and it’ll stay wonderfully fresh and creamy for up to five days. The flavors even intensify a bit, making day-two bites especially irresistible.
Freezing
For longer storage, Red Velvet Strawberry Cheesecake freezes beautifully before adding the strawberry topping. Wrap the whole (uncut) cheesecake or individual slices tightly with both plastic wrap and aluminum foil. Freeze for up to two months; thaw overnight in the refrigerator. Add the topping after thawing for maximum freshness and texture.
Reheating
No need to reheat this dessert—cheesecake is best enjoyed chilled! If you prefer a softer bite, just let your slice sit at room temperature for around 15 minutes before serving. The flavors mellow and the layers melt together in the most heavenly way.
FAQs
Can I make Red Velvet Strawberry Cheesecake ahead of time?
Absolutely! In fact, it tastes best after an overnight chill. You can prepare the entire dessert a day or two in advance, and just add the strawberry topping and garnishes right before serving for maximum freshness.
What if I don’t have buttermilk for the red velvet cake layer?
No worries! You can make a quick buttermilk substitute by mixing 1/2 cup milk with 1/2 tablespoon of lemon juice or white vinegar. Let it sit for 5 minutes, then use as directed in the recipe.
Can I use frozen strawberries for the topping?
Yes, you can! Just thaw and drain them first, and slightly increase the cooking time so any excess moisture evaporates. The flavor will still be fantastic and intensely strawberry-forward.
How do I prevent my cheesecake from cracking?
The best trick is to avoid over-mixing the batter and to let your cheesecake cool slowly in the oven with the door cracked open. Chilling thoroughly afterward also helps keep the top smooth and flawless.
Can I make this recipe gluten-free?
Definitely! Swap the all-purpose flour in the cake layer with your favorite gluten-free blend (make sure it contains xanthan gum or another binder for best results) and follow the rest of the steps as written.
Final Thoughts
If you’re on the hunt for a dessert that’s both beautiful and completely unforgettable, you can’t go wrong with Red Velvet Strawberry Cheesecake. It may look fancy, but every step is do-able at home—and the result is pure joy in every bite! Gather your ingredients, invite some friends, and treat everyone (yourself included!) to a slice of something truly special. You’re going to love it.
PrintRed Velvet Strawberry Cheesecake Recipe
Indulge in the perfect combination of red velvet cake and creamy cheesecake with a fresh strawberry topping in this decadent Red Velvet Strawberry Cheesecake recipe.
- Prep Time: 35 minutes
- Cook Time: 1 hour 15 minutes
- Total Time: ~6 hours
- Yield: 12 slices 1x
- Category: Dessert
- Method: Baking
- Cuisine: American
- Diet: Vegetarian
Ingredients
For the Red Velvet Cake Layer:
- 1 1/4 cups (160 g) all-purpose flour
- 1 tablespoon unsweetened cocoa powder
- 1/2 teaspoon baking soda
- 1/4 teaspoon salt
- 1/2 cup (115 g) unsalted butter, softened
- 1 cup (200 g) granulated sugar
- 2 large eggs
- 1/2 cup (120 ml) vegetable oil
- 1 teaspoon vanilla extract
- 1 teaspoon white vinegar
- 1 tablespoon red food coloring
- 1/2 cup (120 ml) buttermilk
For the Cheesecake Layer:
- 16 ounces (450 g) cream cheese, softened
- 2/3 cup (130 g) granulated sugar
- 2 large eggs
- 1 teaspoon vanilla extract
- 1/2 cup (120 ml) sour cream
For the Strawberry Topping:
- 2 cups (300 g) fresh strawberries, hulled and sliced
- 1/3 cup (70 g) granulated sugar
- 1 tablespoon lemon juice
- 1 teaspoon cornstarch mixed with 1 tablespoon water (optional, for thickening)
For Garnish:
- Fresh whole strawberries
- Whipped cream (optional)
Instructions
- Prepare the Cake Layer: Preheat oven to 350°F (175°C). Grease and line a 9-inch springform pan. In a bowl, sift together flour, cocoa, baking soda, and salt. In another bowl, cream butter and sugar until fluffy. Add eggs one at a time, then mix in oil, vanilla, vinegar, and red food coloring. Alternate adding dry ingredients and buttermilk until batter is smooth. Spread evenly in the prepared pan. Bake for 20–25 minutes, until set but not overbaked. Cool slightly.
- Make Cheesecake Layer: In a large bowl, beat cream cheese and sugar until creamy. Add eggs one at a time, then stir in vanilla and sour cream. Pour over the baked red velvet cake layer, smoothing the top. Bake at 325°F (160°C) for 45–50 minutes, until the center is almost set. Turn off the oven, crack the door open, and let the cheesecake cool inside for 1 hour. Refrigerate for at least 4 hours or overnight.
- Prepare Strawberry Topping: In a saucepan, combine strawberries, sugar, and lemon juice. Cook over medium heat until strawberries release their juices, about 5–7 minutes. If you prefer a thicker topping, stir in the cornstarch mixture and cook for 1–2 minutes until slightly thickened. Let cool completely.
- Assemble the Cheesecake: Remove the chilled cheesecake from the springform pan. Spoon the cooled strawberry topping over the cheesecake.
- Decorate & Serve: Garnish with fresh whole strawberries and whipped cream if desired. Slice and enjoy this indulgent, bakery-worthy dessert!
Nutrition
- Serving Size: 1 slice
- Calories: ~480 kcal
- Sugar: 28g
- Sodium: 370mg
- Fat: 32g
- Saturated Fat: 17g
- Unsaturated Fat: 11g
- Trans Fat: 0g
- Carbohydrates: 43g
- Fiber: 1g
- Protein: 7g
- Cholesterol: 140mg
Keywords: #RedVelvetCheesecake #StrawberryDesserts #CheesecakeLovers #ElegantCakes #CelebrationDesserts