Swirled Chocolate Dream Cake Recipe
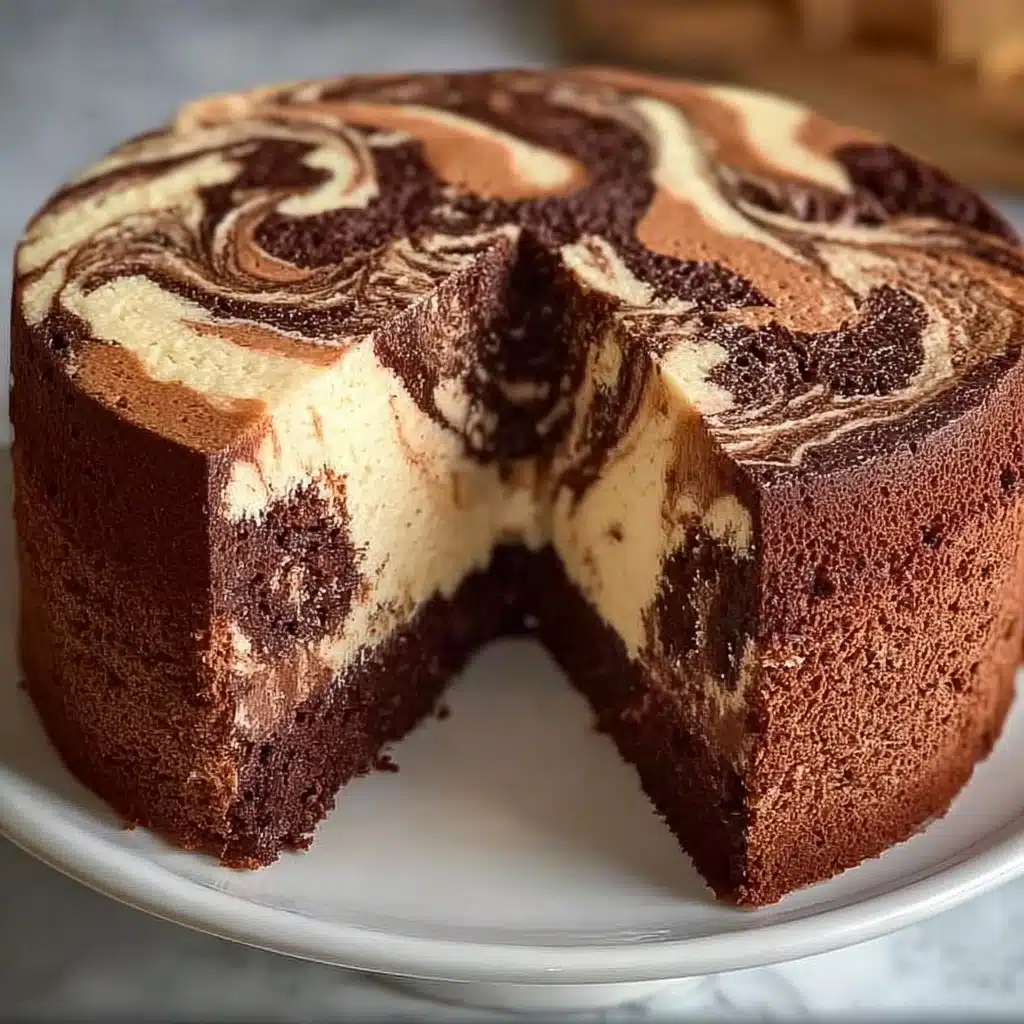
If you’ve ever yearned for a cake that feels like a cozy hug but dazzles like the centerpiece of a celebration, your search ends with the Swirled Chocolate Dream Cake. This stunner delivers the best of both worlds: deep, chocolatey richness with ribbons of luscious cream cheese and glossy chocolate sauce, all in a dreamy, moist crumb that never fails to impress. Whether it’s for a gathering with friends, a family treat, or your own sweet craving, every bite delivers pure joy—a swirl of textures and flavors that’s truly unforgettable.
Ingredients You’ll Need
Ingredients You’ll Need
What makes Swirled Chocolate Dream Cake extra special is how each basic ingredient brings something crucial to the table—flavor, texture, or that signature swirl. You’ll find these pantry staples truly shine together, making every step (and bite) worth it!
- All-purpose flour: The structure of the cake depends on this—usefully neutral, it lets the chocolate shine through.
- Granulated sugar: Sweetens the batter and helps achieve that perfect, tender crumb.
- Unsweetened cocoa powder: Brings deep, bold chocolate flavor you can see and taste in every slice.
- Baking powder: Works with baking soda for optimal rise; a fresh leavening agent ensures your cake isn’t too dense.
- Baking soda: Interacts with buttermilk for an extra soft and airy crumb.
- Salt: Just a hint, but it balances the sweet and chocolate notes beautifully.
- Large eggs: These bind everything together and contribute to that moist, springy texture.
- Buttermilk: The not-so-secret moisture booster, it adds tanginess and keeps the cake ultra-tender.
- Vegetable oil: Provides moisture without weighing things down—a must for meltingly soft cakes.
- Vanilla extract: Brings warmth and rounds out the chocolatey depth.
- Hot coffee: Enhances the cocoa flavor, making the chocolate even more intense—no coffee taste in the end, we promise!
- Cream cheese frosting: The creamy swirl that ribbons through the top, giving tang and smoothness that complements the cake.
- Chocolate sauce: For those swirly chocolate rivers on top; go homemade or grab a favorite bottled version.
How to Make Swirled Chocolate Dream Cake
Step 1: Prep Your Pan and Oven
Crank up the excitement (and your oven) to 350°F (175°C), and don’t forget to grease your bundt pan thoroughly. This step is all about ensuring your beautiful Swirled Chocolate Dream Cake releases with that signature sculpted finish. I like to use a light coating of butter or baking spray, making sure to get into all the nooks and crannies of the pan—no sticking allowed!
Step 2: Mix the Dry Ingredients
In your largest mixing bowl, combine the flour, sugar, cocoa, baking powder, baking soda, and salt. Whisk them together until everything looks uniform and there are no sneaky lumps hiding out—this even blend makes sure each bite of the Swirled Chocolate Dream Cake is consistently chocolaty and tender.
Step 3: Add Wet Ingredients and Combine
Time to bring it all together! Crack in the eggs, pour in the buttermilk, add the oil, and a splash of vanilla extract. Beat until the mixture is gorgeously smooth and thick. At this stage, the aroma alone might have you swooning—it’s already smelling like cake dreams come true.
Step 4: Stir in Hot Coffee
This is the secret boost. Carefully stir in the hot coffee until the batter is well combined. Don’t worry about how thin the batter looks—that’s exactly what gives the Swirled Chocolate Dream Cake its trademark moist and tender crumb. The coffee deepens the chocolate flavor without leaving a trace of bitterness.
Step 5: Pour and Bake
Pour the batter into your prepared bundt pan, smoothing the top as needed. Slide it into the oven and bake for 40–45 minutes, or until a toothpick comes out clean or with a few moist crumbs. The wait is honestly the hardest part—you’ll know it’s ready when your kitchen smells like pure chocolate heaven!
Step 6: Cool and Remove from Pan
Let the cake cool in the pan for about 15–20 minutes (this helps to prevent breaking), then gently turn it out onto a wire rack to cool completely. Patience pays off here; unmolding too soon can lead to heartbreak, so let gravity and time do the work.
Step 7: Swirl the Frosting and Chocolate Sauce
Once your Swirled Chocolate Dream Cake is cool to the touch, get swirling! Dollop the cream cheese frosting over the top, then drizzle on the chocolate sauce. Using a skewer or knife, swirl them together for that marbled, glossy finish that sets this cake apart. This is honestly the most fun part, so go wild—your cake will look like a work of (edible) art.
How to Serve Swirled Chocolate Dream Cake
Garnishes
For an extra pop, a shower of chocolate shavings, a sprinkle of cocoa powder, or fresh berries can bring contrasting color and a playful finish to your Swirled Chocolate Dream Cake. Don’t underestimate a dusting of powdered sugar, either; it highlights every swirl and makes things look extra inviting.
Side Dishes
Pair your Swirled Chocolate Dream Cake with a scoop of vanilla ice cream or a dollop of fresh whipped cream for an over-the-top dessert experience. If you’re serving after dinner, a mug of hot coffee or an espresso pairs beautifully and enhances those chocolate notes even more.
Creative Ways to Present
This cake shines at gatherings! Try slicing and plating each piece with an extra drizzle of chocolate sauce and a bright strawberry on the side. You can even build a “cake platter” with alternating slices and little bowls of frosting and sauce for guests to swirl their own creations. It’s a showstopper however you serve it!
Make Ahead and Storage
Storing Leftovers
If you’re lucky enough to have leftovers, wrap the cake tightly in plastic wrap or store in an airtight container at room temperature for up to 2 days. For longer keeping, pop it in the fridge; the frosting stays fresh, and the cake retains its wonderful moisture.
Freezing
Yes, Swirled Chocolate Dream Cake freezes beautifully! For best results, freeze the cake (without frosting and sauce) wrapped well in plastic and foil. When ready to indulge, thaw at room temperature, then add the swirls fresh for that just-made magic.
Reheating
To enjoy a slice warm, microwave it for 10–15 seconds—just enough to gently soften the cake and loosen the chocolate swirls. If you’ve refrigerated the cake, let it come to room temperature before serving for the best texture and flavor.
FAQs
Can I use Dutch-processed cocoa powder instead of natural?
Dutch-processed cocoa will make the cake even darker and a bit richer, but may reduce acidity and affect the rise slightly. Either will be delicious, but natural cocoa’s acidity pairs best with the baking soda and buttermilk.
Is it possible to make this Swirled Chocolate Dream Cake gluten-free?
Absolutely! Swap the all-purpose flour for a good-quality 1-for-1 gluten-free flour blend. The cake will stay moist and tender, just double-check your baking powder and chocolate sauce are certified gluten-free.
What’s the best way to get the chocolate swirl effect?
Drizzle the cream cheese frosting and chocolate sauce generously over the cooled cake, then use a thin skewer or knife to gently swirl them together. Don’t overmix; visible swirls look beautiful and taste incredible.
Can I make this cake in another pan if I don’t have a bundt?
You can! This recipe will fit nicely in a 9×13-inch pan (reduce baking time a little and check for doneness) or two 8-inch rounds. The swirl decorations work beautifully on sheet cakes too.
How do I keep the Swirled Chocolate Dream Cake from sticking to the pan?
Be thorough with your grease—use softened butter or nonstick spray and really get into each corner. You can also dust the pan lightly with cocoa powder to help release the cake and add extra chocolate flavor.
Final Thoughts
Whether you’re baking for a celebration or simply treating yourself, Swirled Chocolate Dream Cake promises to make any moment feel a little more magical. Each slice is a testament to how simple ingredients, a splash of creativity, and a love for chocolate can create something truly dreamy. Give it a whirl—you just might find your new favorite cake!
PrintSwirled Chocolate Dream Cake Recipe
Indulge in the decadent swirls of this Swirled Chocolate Dream Cake that combines rich chocolate flavors with creamy frosting for a dessert that will delight your taste buds.
- Prep Time: 15 minutes
- Cook Time: 40-45 minutes
- Total Time: 1 hour
- Yield: 1 bundt cake 1x
- Category: Dessert
- Method: Baking
- Cuisine: American
- Diet: Vegetarian
Ingredients
Cake:
- 1 ½ cups all-purpose flour
- 1 cup granulated sugar
- ½ cup unsweetened cocoa powder
- 1 teaspoon baking powder
- ½ teaspoon baking soda
- ½ teaspoon salt
- 2 large eggs
- 1 cup buttermilk
- ½ cup vegetable oil
- 1 teaspoon vanilla extract
- ½ cup hot coffee
Toppings:
- 1 cup cream cheese frosting
- ¼ cup chocolate sauce
Instructions
- Preheat oven to 350°F (175°C). Grease a bundt pan.
- In a large bowl, mix flour, sugar, cocoa, baking powder, baking soda, and salt. Add eggs, buttermilk, oil, and vanilla; beat until smooth. Stir in hot coffee (batter will be thin).
- Pour into pan and bake for 40-45 minutes or until a toothpick comes out clean.
- Cool completely, then remove from pan.
- Swirl cream cheese frosting and chocolate sauce over the top.
- Slice, Serve and Enjoy 😋💕😊
Nutrition
- Serving Size: 1 slice
- Calories: 320
- Sugar: 22g
- Sodium: 280mg
- Fat: 18g
- Saturated Fat: 7g
- Unsaturated Fat: 9g
- Trans Fat: 0g
- Carbohydrates: 36g
- Fiber: 2g
- Protein: 5g
- Cholesterol: 45mg
Keywords: #swirlchocolatedreamcake, #chocolatecake, #swirlcake, #cake, #cakedesign, #everyoneシ゚, #DessertGoals, #everyonehighlights, #yanavlogger, #recipeyouwant, #sweets, #everyoneactive, #dessertrecipe, #DessertLovers, #recipeideas, #recipeshare, #DeliciousDesserts, #DeliciousFood, #yummycake, #yummyfood, #sharing, #bakinglove, #foodie, #foodlover, #foodvlogger, #dessert, #baking, #chocolatelover, #cakerecipe, #sharingiscaring

